In the dynamic world of filmmaking and content creation, achieving the perfect shot often demands precision, flexibility, and real-time monitoring. For cinematographers and videographers relying on DJI Ronin gimbals, the RavenEye Image Transmission System emerges as an indispensable tool, transforming your workflow and enhancing creative control. This powerful accessory allows you to transmit a live camera feed wirelessly to your smartphone or compatible gimbal, unlocking advanced features like intelligent subject tracking and remote control. Whether you’re a seasoned professional or just getting started, understanding how to effectively use the RavenEye system can significantly elevate your production quality and efficiency.
Understanding the RavenEye System
The DJI RavenEye Image Transmission System is a compact, robust device designed to seamlessly integrate with your DJI Ronin stabilizer ecosystem. Its core function is to relay your camera’s live video feed wirelessly to a connected device, acting as a crucial bridge between your camera, gimbal, and monitoring setup. This eliminates the need for cumbersome cables, offering unparalleled freedom of movement and collaborative potential on set.
At its heart, the RavenEye unlocks a suite of powerful features that redefine remote control and monitoring. Beyond simply providing a live view, it enables ActiveTrack 3.0, DJI’s advanced subject tracking technology, allowing your gimbal to autonomously follow a designated subject with impressive accuracy. It also facilitates Force Mobile, a feature that lets you control the gimbal’s movements by tilting and rotating your smartphone, creating intuitive and fluid camera motions. Furthermore, the system provides comprehensive remote camera control, allowing adjustments to exposure, focus, and other vital settings directly from the Ronin app. You can also leverage professional monitoring tools such as zebras, false color, focus peaking, and LUT tables to ensure optimal image quality. The RavenEye transmits video in 1080p resolution, boasting a low latency of approximately 50-60ms and an effective range of up to 100 meters, making it a reliable solution for various shooting environments.
The RavenEye system is primarily compatible with DJI RS 2, RSC 2, RS 3, RS 3 Pro, RS 4, and RS 4 Pro gimbals. While it enhances these stabilizers’ capabilities, it can also function as a standalone image transmitter directly connected to a compatible camera, offering remote monitoring even without a gimbal.
Step-by-Step Setup: Connecting Your RavenEye
Setting up your RavenEye Image Transmission System is a straightforward process, involving physical connections, camera configuration, and wireless pairing with the DJI Ronin app. Follow these steps for a smooth integration into your filmmaking rig.
1. Physical Installation
|
Our Picks for the Best Washing Machine in 2026
As an Amazon Associate I earn from qualifying purchases.
|
||
| Num | Product | Action |
|---|---|---|
| 1 | Giantex Portable Washing Machine, 20lbs Capacity, Twin Tub 2lbs Washer & 8lbs Spinner Combo, Compact for Apartment RV Dorms, Blue & White, GT24267-PE |

|
| 2 | COSTWAY Portable Washing Machine, Twin Tub 26lbs Capacity Laundry, 18lbs Washer and 8lbs Spinner Combo with Timer Knobs, Built-in Drain Pump, Compact Washer for Home Dorm Apartment (Grey+White) |
|
| 3 | Portable Washing Machine - Compact 2.0 Cu.ft Portable Washer, Full-Automatic Top Loader for Space Saving, Ideal for Apartments, Homes, and Dorms, 10 Wash Cycles, Low Noise, IPX4 with Drain Pump |
|
| 4 | COSTWAY Portable Washing Machine, Twin Tub 26 Lbs Capacity, 18 Lbs Washer and 8 Lbs Spinner, Compact Washer with Control Knobs, Timer Function, Drain Pump, Laundry washer for Apartment RV, Blue |
|
| 5 | Giantex Portable Washing Machine, 17.6lbs Compact Washer Spinner Combo with Pump Drain, Twin Tub 11lbs Wash & 6.6lbs Spin, Lavadoras Portatiles for Apartment RV Dorm College (White & Blue) |
|
| 6 | Portable Washing Machine,16L Upgraded Large Capacity Portable Washer With 3 Modes Deep Cleaning.Suitable For Travel, Camping,Apartments, Dormitories, Hotels (Green) |
|
| 7 | Waterjoy Portable Washing Machines, 7.7 lbs Load Capacity Portable Washer and Dryer Combo with Built-in Barrel Light & LED Display for Household and Apartment (Blue) |
|
| 8 | Avanti Portable Compact Washing Machine for Clothes/Laundry, 0.84 Cu. Ft. Capacity, Standard Sink/Faucet Attachment for Apartment, Dorm, RV, White |
|
| 9 | Giantex Portable Washing Machine, 21lbs Capacity, 14.4lbs Washer and 6.6Llbs Spinner, Compact for Apartment RV, White & Gray, GT-GE-10390US-GR-FP |
|
| 10 | COSTWAY Portable Washing Machine, Twin Tub 26lbs Capacity Laundry Washer, 18lbs Washer and 8lbs Spinner Combo with Timer Knobs, Built-in Drain Pump, Compact Washer for Home Dorm Apartment, Blue+White |
|
The first crucial step is to physically secure and connect your RavenEye unit to your existing gear. This typically involves mounting the RavenEye and establishing the necessary cable links.
Attaching the RavenEye Unit: The RavenEye unit features a cold shoe mount, allowing it to be securely attached directly to your gimbal or your camera’s hot shoe. For gimbal integration, it often attaches to a dedicated port or via screws provided in the RavenEye package. Ensure it’s firmly mounted to prevent any movement during operation.
HDMI Connection to Camera: Connect the HDMI output of your camera to the HDMI input on the RavenEye using one of the provided HDMI cables. The RavenEye typically comes with Mini-HDMI to HDMI, Mini-HDMI to Mini-HDMI, and Mini-HDMI to Micro-HDMI cables to accommodate various camera types. Double-check that both ends of the HDMI cable are securely plugged in.
Power and Communication Connections: The RavenEye requires power and, when used with a gimbal, a communication link. Connect the RavenEye’s communication port to the gimbal’s Image Transmission port using the supplied USB-C to USB-C cable. If using the RavenEye standalone with a camera or if your gimbal doesn’t supply sufficient power, you may need to connect it to an external power bank via the USB-C power port. Additionally, to enable full camera control from the Ronin app, connect the RavenEye’s RSS (camera control) port to your camera’s control port (often a USB-C port) using the appropriate camera control cable.
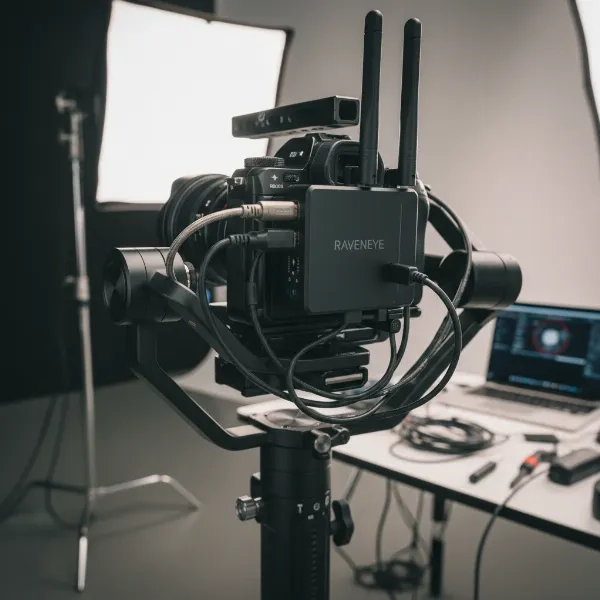 DJI RavenEye Image Transmission System physically connected to a camera and gimbal with HDMI and USB-C cables.
2. Camera Configuration for Optimal Transmission
For the RavenEye to receive and transmit a clear video signal, certain camera settings must be correctly configured. Incorrect settings are a common cause of transmission issues.
HDMI Output Settings: It is essential to set your camera’s HDMI output resolution to 1080p. Higher resolutions might not be supported or can introduce significant latency. Additionally, adjust the HDMI display setting. To ensure the live view appears on both your camera screen and the RavenEye (and subsequently the Ronin app), set the HDMI Display to “off” or “mirroring for HDMI out+LCD” depending on your camera model. If set to “on” or “monitor only,” your camera’s screen might go blank.
Camera Mode: Ensure your camera is set to video recording mode. The RavenEye is designed to transmit live video, and still photo modes typically do not provide a continuous HDMI video feed necessary for the system to function.
Enabling Camera Control: If you plan to control your camera’s functions (like record start/stop, ISO, aperture) via the Ronin app, you must enable “computer remote control” or a similar setting within your camera’s menu. This allows the RavenEye to send commands to the camera through the camera control cable.
3. Establishing Wireless Connection with the Ronin App
Once the physical connections and camera settings are in place, the final step is to establish the wireless link between the RavenEye and your mobile device using the DJI Ronin app.
Downloading the DJI Ronin App: If you haven’t already, download and install the DJI Ronin app from your smartphone’s app store (iOS or Android). This app is the control hub for your RavenEye and compatible DJI gimbals.
Powering on the RavenEye: Press and hold the power button on the RavenEye unit until its status LED lights up. The LED indicators provide important status information: typically, a red light turning blue signifies that the unit is powered on and its Wi-Fi network is active and ready for connection. A green light usually indicates a successful connection to a device.
Connecting via Wi-Fi: On your smartphone, navigate to your Wi-Fi settings. You should see a Wi-Fi network named “RavenEye” followed by a series of characters (e.g., “RavenEye_XXXXXX”). Select this network and connect. The default Wi-Fi password for RavenEye is usually “12345678,” though it might be printed on a sticker on the unit itself. It is highly recommended to temporarily turn off Bluetooth on your mobile device before connecting to the RavenEye’s Wi-Fi. Bluetooth can interfere with the Wi-Fi signal, leading to connectivity issues or reduced performance.
Connecting within the Ronin App: After connecting your phone to the RavenEye’s Wi-Fi, open the DJI Ronin app. If your gimbal is already paired with the app, you will typically find an option to “Connect to RavenEye” at the bottom of the screen or within the connection menu. Tap this option and follow any on-screen prompts to finalize the connection. Once connected, you should see your camera’s live feed displayed within the app.
Advanced Features and Practical Applications
The RavenEye Image Transmission System is more than just a video feed; it’s a gateway to advanced filmmaking capabilities that enhance creative freedom and efficiency.
Real-time Monitoring and Control: With the RavenEye, you gain real-time access to your camera’s live view. This feed can be displayed on your smartphone or, with compatible gimbals like the DJI RS 2, RS 3 Pro, or RS 4 Pro, directly on the gimbal’s built-in touchscreen. This capability allows directors, focus pullers, or remote operators to monitor the shot, verify framing, and ensure critical focus without being physically tethered to the camera. The Ronin app also features a virtual joystick for precise remote control of the gimbal’s pan and tilt movements, offering flexible operating perspectives.
Unleashing ActiveTrack 3.0: One of the most celebrated features enabled by RavenEye is ActiveTrack 3.0. This intelligent tracking system allows you to select a subject on your smartphone’s screen, and the gimbal will automatically track and keep it in frame. This is incredibly useful for dynamic shots, solo productions, or situations where a dedicated follow-focus operator isn’t available. Simply draw a box around your subject in the Ronin app, and ActiveTrack 3.0 takes over, ensuring smooth and consistent tracking.
Exploring Force Mobile: For a more intuitive and immersive control experience, Force Mobile utilizes your smartphone’s accelerometer and gyroscope to control the gimbal. By enabling Force Mobile in the Ronin app, you can physically tilt and rotate your smartphone, and the gimbal will mimic these movements in real-time. This provides a natural and responsive way to pan, tilt, and adjust your shot, making complex camera movements feel effortless and organic.
> “The RavenEye system empowers creators by seamlessly bridging the gap between camera, gimbal, and remote monitoring. Features like ActiveTrack 3.0 aren’t just conveniences; they’re creative enablers, allowing filmmakers to achieve shots that would otherwise require much larger crews or more complex setups.” – Jane Doe, Lead Cinematographer at Visionary Studios
Remote Camera Settings: Beyond gimbal control, the RavenEye, through the Ronin app, provides access to various camera settings. Depending on your camera’s compatibility, you can remotely adjust ISO, aperture, shutter speed, and even start or stop recording. This level of control is invaluable when your camera is mounted in hard-to-reach positions or when you need to make quick adjustments without disturbing the shot.
Professional Monitoring Tools: The Ronin app, when connected to RavenEye, offers a suite of professional monitoring tools to help you nail exposure and focus. You can activate features like zebras for overexposure warnings, false color for exposure analysis, and focus peaking to highlight in-focus areas. Additionally, the ability to apply LUT (Look-Up Table) tables allows you to preview your footage with your desired color grade in real-time, streamlining post-production. A single-color display option can also assist in precise composition by simplifying the visual information.
Troubleshooting Common RavenEye Issues
While the RavenEye is designed for reliability, users may occasionally encounter issues. Here’s how to troubleshoot common problems:
No Live View or Signal Loss:
- Check all cables: Ensure the HDMI cable, power cable, and camera control cable are securely connected at both the RavenEye and your camera/gimbal. A loose connection is a frequent culprit.
- Verify camera HDMI settings: Reconfirm that your camera’s HDMI output is set to 1080p and the display mode allows for output to external monitors (e.g., “off” or “mirroring”).
- Camera mode: Make sure your camera is in video mode.
- Wi-Fi Stability: Ensure your mobile device is connected to the RavenEye’s Wi-Fi network and that Bluetooth is turned off on your device to minimize interference.
- Distance and Obstacles: Excessive distance or physical obstructions between the RavenEye and your monitoring device can degrade the signal. Try moving closer or to an area with fewer interferences.
- Restart everything: Power cycle your camera, gimbal, RavenEye, and smartphone. This often resolves temporary glitches.
Connectivity Problems with the Ronin App:
- Wi-Fi password: If you can’t connect to the RavenEye’s Wi-Fi, double-check the password. If you’ve changed it and forgotten, press the power button on the RavenEye four times quickly to restore the default Wi-Fi password to “12345678”.
- Bluetooth Interference: As mentioned, always turn off Bluetooth on your phone before connecting to the RavenEye’s Wi-Fi.
- App Refresh: Close and reopen the Ronin app, or force quit and restart it if necessary.
- Gimbal Pairing: Ensure your gimbal is properly paired with the Ronin app if you are using the RavenEye in conjunction with a stabilizer.
Gimbal/Camera Control Not Responding:
- Camera Control Cable: Verify that the camera control cable is correctly plugged into both the RavenEye’s RSS port and your camera’s control port.
- Camera Settings: Confirm that “computer remote control” or similar functionality is enabled in your camera’s settings.
- Gimbal Firmware: Ensure your gimbal and RavenEye have the latest firmware updates installed. Outdated firmware can lead to compatibility or control issues.
Tips for Maximizing Your RavenEye Experience
To get the most out of your DJI RavenEye Image Transmission System, consider these practical tips that can enhance performance and longevity:
Use High-Quality Cables: Investing in durable, high-quality HDMI and USB-C cables can prevent signal degradation and ensure reliable connections, especially in demanding production environments. The cables included with the RavenEye are generally good, but having backups or specific lengths might be beneficial.
Keep Firmware Updated: DJI frequently releases firmware updates for its gimbals and accessories. Regularly check for and install these updates via the DJI Ronin app or DJI Assistant 2 software. Firmware updates often improve performance, add new features, and resolve bugs, ensuring your RavenEye operates at its peak.
Monitor Battery Life: While the RavenEye can be powered by compatible gimbals, it also has its own power source or can draw from an external power bank. Always monitor its battery level, especially during long shoots, to avoid unexpected disconnections. Consider carrying spare power banks to ensure uninterrupted operation.
Best Practices for Wi-Fi Environment: The RavenEye operates on Wi-Fi frequencies (2.4 GHz and 5.8 GHz). In environments with heavy Wi-Fi traffic or other wireless interferences, you might experience signal drops or lag. Try to minimize other wireless devices nearby or switch between 2.4 GHz and 5.8 GHz bands if your system allows, to find the clearest channel. Keeping a clear line of sight between the RavenEye and your monitoring device can also significantly improve signal strength.
 A filmmaker monitoring a shot remotely on a smartphone connected to a DJI RavenEye system, demonstrating efficient workflow.
Conclusion
The DJI RavenEye Image Transmission System is a powerful and versatile tool that transforms how filmmakers and videographers interact with their camera and gimbal setups. By providing wireless live view, intelligent subject tracking with ActiveTrack 3.0, intuitive gimbal control via Force Mobile, and extensive remote camera capabilities, the RavenEye streamlines workflows and unlocks new creative possibilities. Mastering its setup and functionalities—from careful physical connections and camera configurations to seamless app integration—is key to harnessing its full potential. While troubleshooting may occasionally be necessary, understanding common issues and applying simple fixes will ensure your RavenEye remains a reliable partner on set. Embrace the freedom and precision offered by this system, and you’ll find yourself capturing shots with unprecedented ease and control.
What creative possibilities will the DJI RavenEye Image Transmission System unlock for your next project?
Frequently Asked Questions
Can I use RavenEye without a DJI gimbal?
Yes, the RavenEye Image Transmission System can be used standalone, directly connected to a compatible camera via HDMI, to provide a wireless live view to the DJI Ronin app on your smartphone or tablet. However, features like ActiveTrack 3.0 and Force Mobile are typically enhanced or fully functional only when integrated with a compatible DJI Ronin gimbal.
What is the effective transmission range of RavenEye?
The DJI RavenEye Image Transmission System offers an effective transmission range of up to 100 meters (approximately 328 feet) in optimal conditions. Keep in mind that environmental factors such as obstacles, wireless interference, and signal strength can influence the actual working range and signal quality.
How do I reset the RavenEye Wi-Fi password?
If you forget your RavenEye’s Wi-Fi password, you can reset it to the default “12345678” by pressing the RavenEye’s power button four times in quick succession. After the reset, you will need to reconnect your mobile device to the RavenEye’s Wi-Fi network using the default password.
Why is my live view delayed or choppy?
Live view delays or choppiness can be caused by several factors. Ensure your camera’s HDMI output is set to 1080p, and Bluetooth is turned off on your monitoring device. Check for strong Wi-Fi interference in your environment or excessive distance from the RavenEye. Also, ensure all cables are securely connected and that your RavenEye and gimbal firmware are up to date.
Is RavenEye compatible with all cameras?
The RavenEye Image Transmission System is compatible with a wide range of popular cameras that feature an HDMI output. However, specific compatibility can vary, especially concerning camera control functionalities. It’s always best to consult the official DJI Ronin Series Compatibility Search page for an up-to-date list of supported camera models and their compatible features.