The Blackmagic Pocket Cinema Camera 6K Pro, with its stunning image quality and powerful features, is a filmmaker’s dream. When paired with the formidable DJI RS 3 Pro gimbal, designed for heavier camera setups and professional-grade stabilization, you have a potent combination for capturing breathtaking cinematic footage. However, harnessing this power requires a crucial first step: achieving perfect balance. Without it, your gimbal will struggle, battery life will diminish, and your footage will lack the buttery smoothness you crave. This comprehensive guide will walk you through every detail, ensuring your BMPCC 6K Pro rig is perfectly balanced on your DJI RS 3 Pro, ready for any shoot.
Understanding the DJI RS 3 Pro and BMPCC 6K Pro Dynamic
The DJI RS 3 Pro boasts an impressive payload capacity of up to 10 lbs (4.5 kg), making it a suitable contender for the BMPCC 6K Pro, which is known for its robust build and often heavier lens choices. The BMPCC 6K Pro itself, when fully rigged with a lens, battery, external monitor, or follow focus system, can become quite weighty and asymmetrical. This inherent characteristic demands meticulous attention during the balancing process. Proper balance isn’t just about preventing motor strain; it’s about unlocking the gimbal’s full potential, allowing it to execute complex movements effortlessly and deliver consistently smooth, professional-looking results without jarring jitters or drifts.
Pre-Balancing Checklist: Preparing Your Rig
Before you even think about adjusting the gimbal arms, a thorough preparation of your camera rig is paramount. Any change to your setup after balancing will necessitate re-balancing.
Begin by mounting your BMPCC 6K Pro onto its quick release plate. Many users opt for a camera cage (like those from SmallRig or Tilta) for added protection and more mounting points. If using one, ensure it’s securely attached. Next, attach all essential accessories that will be part of your shooting setup. This includes your chosen lens, external power solution (V-mount battery, NP-F batteries), external monitor, wireless video transmitter, follow focus motor, and microphones. Ensure all cables are connected and routed cleanly, mimicking your final shooting configuration. Power on your camera and all accessories, making sure everything is in its operational state. This accounts for any minor weight shifts that occur when components are active.
Step-by-Step Balancing Guide for DJI RS 3 Pro
Achieving perfect balance is a methodical process involving four main axes. Patience and precision are your best tools here.
1. Horizontal Tilt Axis Balance (Forward-Backward)
|
Our Picks for the Best Washing Machine in 2026
As an Amazon Associate I earn from qualifying purchases.
|
||
| Num | Product | Action |
|---|---|---|
| 1 | Portable Washing Machine,16L Upgraded Large Capacity Portable Washer With 3 Modes Deep Cleaning.Suitable For Travel, Camping,Apartments, Dormitories, Hotels (Green) |

|
| 2 | COSTWAY Portable Washing Machine, Twin Tub 26 Lbs Capacity, 18 Lbs Washer and 8 Lbs Spinner, Compact Washer with Control Knobs, Timer Function, Drain Pump, Laundry washer for Apartment RV, Blue |
|
| 3 | Waterjoy Portable Washing Machines, 7.7 lbs Load Capacity Portable Washer and Dryer Combo with Built-in Barrel Light & LED Display for Household and Apartment (Blue) |
|
| 4 | Portable Washing Machine - Compact 2.0 Cu.ft Portable Washer, Full-Automatic Top Loader for Space Saving, Ideal for Apartments, Homes, and Dorms, 10 Wash Cycles, Low Noise, IPX4 with Drain Pump |
|
| 5 | Avanti Portable Compact Washing Machine for Clothes/Laundry, 0.84 Cu. Ft. Capacity, Standard Sink/Faucet Attachment for Apartment, Dorm, RV, White |
|
| 6 | Giantex Portable Washing Machine, 21lbs Capacity, 14.4lbs Washer and 6.6Llbs Spinner, Compact for Apartment RV, White & Gray, GT-GE-10390US-GR-FP |
|
| 7 | COSTWAY Portable Washing Machine, Twin Tub 26lbs Capacity Laundry Washer, 18lbs Washer and 8lbs Spinner Combo with Timer Knobs, Built-in Drain Pump, Compact Washer for Home Dorm Apartment, Blue+White |
|
| 8 | Giantex Portable Washing Machine, 17.6lbs Compact Washer Spinner Combo with Pump Drain, Twin Tub 11lbs Wash & 6.6lbs Spin, Lavadoras Portatiles for Apartment RV Dorm College (White & Blue) |
|
| 9 | Giantex Portable Washing Machine, 20lbs Capacity, Twin Tub 2lbs Washer & 8lbs Spinner Combo, Compact for Apartment RV Dorms, Blue & White, GT24267-PE |
|
| 10 | COSTWAY Portable Washing Machine, Twin Tub 26lbs Capacity Laundry, 18lbs Washer and 8lbs Spinner Combo with Timer Knobs, Built-in Drain Pump, Compact Washer for Home Dorm Apartment (Grey+White) |
|
This is the first crucial step to ensure your camera doesn’t tip forward or backward.
First, unlock the tilt axis by releasing its locking lever. Point your BMPCC 6K Pro horizontally, roughly parallel to the ground. If the camera tilts forward or backward, it means the balance is off. Loosen the knob on the camera mounting plate and gently slide the camera forward or backward until it remains perfectly level without any support. Once it holds its position, lock the camera plate securely. Test by gently pushing the camera; it should return to its horizontal position slowly.
2. Vertical Tilt Axis Balance (Up-Down)
Once the horizontal tilt is set, we move to the vertical plane.
Rotate your BMPCC 6K Pro so the lens points straight up towards the sky. Unlock the tilt axis again. If the camera falls downwards or flips backward, you need to adjust the vertical arm. Loosen the vertical arm’s adjustment knob and slide the entire assembly up or down until the camera remains stationary when pointing straight up. Test this by tilting the camera to various angles; it should hold any position without drifting. Lock the vertical arm once balanced.
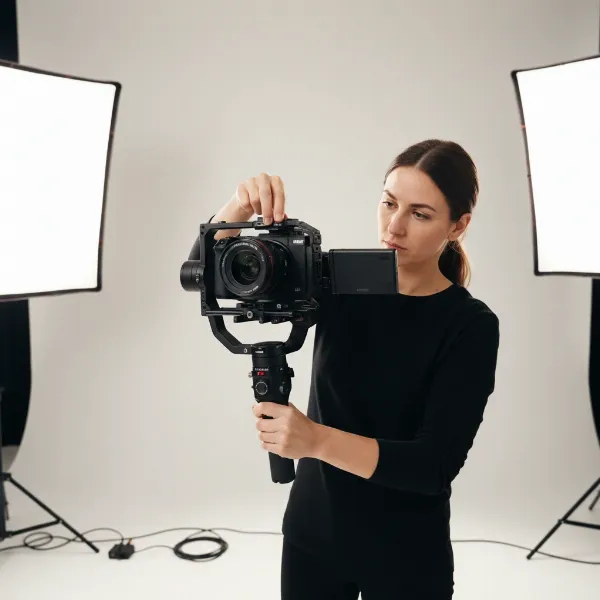 A close-up of a Blackmagic Pocket Cinema Camera 6K Pro mounted on a DJI RS 3 Pro gimbal, showing the tilt axis being adjusted for vertical balance against a blurred background in a studio setting.
3. Roll Axis Balance (Left-Right)
The roll axis ensures your camera doesn’t lean to one side.
Unlock the roll axis. The camera should maintain a perfectly horizontal level, parallel to the ground, without leaning left or right. If it leans, loosen the knob for the roll arm and slide the arm horizontally until the camera sits level. Once balanced, lock the roll axis. A quick check involves tilting the gimbal body; the camera should maintain its horizontal orientation.
4. Pan Axis Balance (Rotation)
Finally, we balance the pan axis, which controls horizontal rotation.
Hold the DJI RS 3 Pro upright. Unlock the pan axis. If your camera rig is heavier on one side, it will tend to rotate in that direction. Loosen the pan axis adjustment knob and slide the entire vertical assembly (which holds the camera and other axes) left or right until the gimbal remains stable when tilted slightly. This means the weight is evenly distributed around the central pan motor. Lock the pan axis once the balance is achieved.
Troubleshooting Common Balancing Challenges
Balancing a robust setup like the BMPCC 6K Pro on the RS 3 Pro can present a few hurdles.
Heavy Camera/Lens Combinations: The BMPCC 6K Pro, especially with cinema lenses, can be front-heavy. If you find it difficult to achieve perfect fore-aft balance even with the plate fully extended, consider using counterweights. SmallRig offers various counterweight kits that attach to the camera plate or the gimbal arms, allowing you to fine-tune the weight distribution. Sometimes, simply using a lighter, more compact lens can also make a significant difference.
Accessory Interference: Cables, monitors, or follow focus motors can sometimes collide with the gimbal’s body or arms, restricting movement and throwing off balance. Ensure all cables are neatly managed and secured with cable ties or clips, allowing for full range of motion. Repositioning accessories slightly or opting for smaller, more streamlined versions can often resolve these issues. Always check for full articulation across all axes after balancing.
Persistent Drift: If, after seemingly perfect manual balancing, your camera still shows a slight drift, particularly on the tilt or roll axis, it might need a final touch. The DJI Ronin app’s “Balance Test” feature is incredibly useful here. It guides you through automated tests for each axis and provides feedback on which direction to make micro-adjustments, ensuring machine-level precision. This can often resolve subtle imbalances that are hard to detect by eye.
Advanced Tips for Optimal Performance
Beyond the basic steps, these tips can help you get the most out of your balanced setup.
Using the DJI Ronin App’s Balance Test: This tool is invaluable for confirming and refining your balance. After performing your manual adjustments, connect your RS 3 Pro to the Ronin app via Bluetooth. Navigate to the balance test feature. The gimbal will run through a series of movements and report the balance status for each axis (tilt, roll, pan). If it indicates an “excellent” balance, you’re good to go. If not, it will guide you on which axis needs minor correction. Trust this digital feedback for ultimate precision.
Saving Custom Profiles: If you frequently use the same BMPCC 6K Pro and lens setup, the DJI RS 3 Pro allows you to save custom user profiles. Once perfectly balanced, save this configuration. This feature is a massive time-saver for future shoots, allowing you to quickly recall your optimal settings and spend less time on setup. Remember to update the profile if you change significant components of your rig.
Regular Re-balancing: Even with a saved profile, minor adjustments can be necessary. Environmental factors like temperature changes can affect lens barrel expansion, and adding or removing small accessories like an ND filter or a matte box flags can shift the center of gravity. Always perform a quick balance check before each shoot to ensure everything is still perfectly aligned for the best results.
“Precision in balancing isn’t just a technical step; it’s the foundation for creative freedom. A perfectly balanced gimbal setup allows filmmakers to focus purely on storytelling, knowing their gear will execute every shot with seamless stability.” – Jane Doe, Professional Cinematographer and Gimbal Specialist
Conclusion
Balancing your Blackmagic Pocket Cinema Camera 6K Pro on the DJI RS 3 Pro is an essential skill that transforms your filmmaking experience. While it requires patience and attention to detail, the reward is exceptionally smooth, professional-grade footage that stands out. By meticulously following each step, preparing your rig thoughtfully, and leveraging the advanced features of the Ronin app, you can conquer any balancing challenge. Remember that practice makes perfect, and with each setup, you’ll gain speed and confidence. Now, go out there and capture stunning cinematic moments with your perfectly stabilized rig.
What’s your go-to lens for the BMPCC 6K Pro, and how does it impact your gimbal balancing workflow?
Frequently Asked Questions
What if my BMPCC 6K Pro setup exceeds the DJI RS 3 Pro’s payload capacity?
The DJI RS 3 Pro has a generous 10 lbs (4.5 kg) payload. If your rig, including all accessories, exceeds this, you might experience motor strain, reduced performance, or difficulty balancing. Consider optimizing your setup with lighter alternatives for lenses or batteries, or explore heavier-duty stabilization solutions like a Steadicam or a larger Ronin 2.
Do I need counterweights for balancing the BMPCC 6K Pro on the RS 3 Pro?
It depends on your specific lens and accessory configuration. The BMPCC 6K Pro can be front-heavy, especially with cinema lenses. If you cannot achieve balance by sliding the camera plate to its maximum position, then counterweights are a necessary addition to shift the center of gravity and achieve proper equilibrium.
How often should I re-balance my gimbal?
You should perform a balance check every time you change a significant component of your rig (e.g., lens, battery, major accessory) or if you notice any unexpected instability in your footage. Even minor environmental changes can affect balance, so a quick check before each shooting session is always recommended.