In the dynamic world of filmmaking and videography, achieving smooth, professional-grade footage is paramount. Gimbals have become indispensable tools for creators, transforming shaky handheld shots into fluid, cinematic sequences. While basic gimbal movements lay a strong foundation, mastering advanced techniques like the parallax and reveal shots can dramatically elevate your storytelling, adding depth, intrigue, and a polished, professional aesthetic to your visuals. These two techniques, when executed skillfully, captivate audiences and imbue your scenes with a powerful visual narrative.
Understanding the Parallax Shot
|
Our Picks for the Best Washing Machine in 2026
As an Amazon Associate I earn from qualifying purchases.
|
||
| Num | Product | Action |
|---|---|---|
| 1 | Avanti Portable Compact Washing Machine for Clothes/Laundry, 0.84 Cu. Ft. Capacity, Standard Sink/Faucet Attachment for Apartment, Dorm, RV, White |

|
| 2 | Waterjoy Portable Washing Machines, 7.7 lbs Load Capacity Portable Washer and Dryer Combo with Built-in Barrel Light & LED Display for Household and Apartment (Blue) |
|
| 3 | COSTWAY Portable Washing Machine, Twin Tub 26lbs Capacity Laundry, 18lbs Washer and 8lbs Spinner Combo with Timer Knobs, Built-in Drain Pump, Compact Washer for Home Dorm Apartment (Grey+White) |
|
| 4 | Giantex Portable Washing Machine, 21lbs Capacity, 14.4lbs Washer and 6.6Llbs Spinner, Compact for Apartment RV, White & Gray, GT-GE-10390US-GR-FP |
|
| 5 | COSTWAY Portable Washing Machine, Twin Tub 26lbs Capacity Laundry Washer, 18lbs Washer and 8lbs Spinner Combo with Timer Knobs, Built-in Drain Pump, Compact Washer for Home Dorm Apartment, Blue+White |
|
| 6 | Portable Washing Machine - Compact 2.0 Cu.ft Portable Washer, Full-Automatic Top Loader for Space Saving, Ideal for Apartments, Homes, and Dorms, 10 Wash Cycles, Low Noise, IPX4 with Drain Pump |
|
| 7 | COSTWAY Portable Washing Machine, Twin Tub 26 Lbs Capacity, 18 Lbs Washer and 8 Lbs Spinner, Compact Washer with Control Knobs, Timer Function, Drain Pump, Laundry washer for Apartment RV, Blue |
|
| 8 | Giantex Portable Washing Machine, 17.6lbs Compact Washer Spinner Combo with Pump Drain, Twin Tub 11lbs Wash & 6.6lbs Spin, Lavadoras Portatiles for Apartment RV Dorm College (White & Blue) |
|
| 9 | Portable Washing Machine,16L Upgraded Large Capacity Portable Washer With 3 Modes Deep Cleaning.Suitable For Travel, Camping,Apartments, Dormitories, Hotels (Green) |
|
| 10 | Giantex Portable Washing Machine, 20lbs Capacity, Twin Tub 2lbs Washer & 8lbs Spinner Combo, Compact for Apartment RV Dorms, Blue & White, GT24267-PE |
|
The parallax shot is a powerful cinematic technique that creates a mesmerizing illusion of depth and movement within your frame. At its core, parallax refers to the perceived displacement or difference in the apparent position of an object viewed along two different lines of sight. In filmmaking, this translates to keeping your subject perfectly centered in the frame while the camera moves in an arc around it, causing the background to appear to move faster than the foreground. This visual separation generates a dynamic, three-dimensional effect that draws the viewer’s eye and adds significant production value.
Filmmakers leverage the parallax shot to emphasize a subject, conveying a sense of wonder, drama, or even panic, creating a traditional “hero shot” in action-packed sequences. It effectively isolates the subject, highlighting its significance against a moving environment. This technique is often seen in Hollywood cinema to create dramatic spins around characters, intensifying the emotional impact of the scene.
How to Execute the Parallax Shot with a Gimbal
Executing a compelling parallax shot requires precision and control over your gimbal and body movement.
- Gimbal Settings: Begin by setting your gimbal to “Pan Follow Mode.” This mode allows the camera to pan horizontally with your movement while maintaining a stable tilt and roll, which is crucial for keeping your subject perfectly framed.
- Camera Movement: The essence of the parallax shot lies in your movement. You need to walk in a smooth, consistent arc or circle around your subject. The key is to continually point the camera at the subject in the center, ensuring it remains fixed in your frame as the background shifts.
- Body Mechanics: Smoothness is paramount to avoid jerky footage. Adopt a “ninja walk” – bend your knees slightly to act as shock absorbers, and place your foot down softly, heel first, then toes. Maintain a consistent distance from your subject throughout the arc. Holding the gimbal with both hands further enhances stability. [cite: 2, 4_1]
- Lens Choice: While wide-angle lenses are commonly used for sweeping shots, longer focal lengths (such as 35mm, 50mm, or even 70mm) are often recommended for a more pronounced parallax effect. Longer lenses compress the foreground and background, making the background appear to move much faster relative to the subject, thus enhancing the dynamic separation and cinematic quality. [cite: 4_1, 5]
- Post-production Techniques: For an even more dramatic effect, consider adding a subtle digital zoom in post-production. If you push in on the subject with the gimbal during the shot, in post, you can apply keyframes to zoom out digitally. This creates a push-in with the camera and a pull-out with the digital zoom, amplifying the parallax illusion. [cite: 1_1]
Creative Applications of the Parallax Shot
The parallax shot offers immense creative versatility. It can be used to:
- Emphasize a Character: Orbiting around a character can highlight their emotions, create a sense of isolation, or underscore their importance in a scene.
- Introduce a Location: Slowly revealing a sweeping landscape or architectural marvel by orbiting a central element can draw viewers into the environment.
- Build Suspense: A slow, deliberate parallax can make the audience feel like they are discovering something alongside the camera, adding tension.
- Show Scale: By moving around a large object, the parallax effect can visually convey its impressive size relative to the environment.
Mastering the Cinematic Reveal Shot
Where the parallax shot creates depth through orbital motion, the reveal shot builds anticipation and introduces subjects or scenes with dramatic impact. A reveal shot is precisely what its name implies: gradually uncovering something previously hidden or partially obscured, slowly bringing it into full view. This technique is designed to build suspense, pique the audience’s curiosity, and deliver a satisfying moment of discovery. [cite: 2_1]
Reveal shots are effective because they mirror how we naturally perceive new information – piece by piece. They can be used to dramatically introduce a character, unveil a breathtaking landscape, or expose a crucial plot element, creating tension and intrigue that keeps your audience engaged. [cite: 2_1]
Types of Reveal Shots
There are several compelling ways to execute a reveal shot:
- Behind an Obstruction: This classic reveal involves starting your camera behind an object (like a bush, a wall, or a door) and smoothly moving the gimbal horizontally, vertically, or even diagonally to pass the obstruction and reveal your subject or scene. The obstruction itself can be an interesting visual element. [cite: 1_2]
- Low to High Reveal: Start with your camera low to the ground, perhaps focusing on a detail like a character’s shoes. Then, smoothly lift the camera upwards, gradually revealing more of the character and their surrounding environment. This method effectively builds a sense of discovery. [cite: 2_1, 5_1]
- Pull-Back Reveal (Full Back Reveal): This technique begins with a tight shot on a subject and then pulls the camera backward, expanding the frame to reveal the broader context or environment. It’s excellent for establishing a scene or showing the scale of a location relative to the subject. [cite: 3_1]
- Through an Object (Fake Drone Effect): Position your camera close to an object with a gap (e.g., a window, an archway) and push the gimbal forward through it to reveal the scene beyond. This can create a unique “fake drone” effect, adding dynamism to your shot. Ensure the camera and gimbal can pass safely. [cite: 2_2]
- Tilting Down from a High Point: Start with your camera aimed high, perhaps at the top of a building or a tree. As you walk backward, simultaneously tilt the gimbal down to unveil your subject or the scene below. This creates a dramatic and grand reveal. [cite: 5_2]
Executing the Reveal Shot with a Gimbal
Precision in movement and composition is key for a successful reveal.
- Gimbal Settings: For many reveal shots, especially those moving linearly, “Lock Mode” can be effective, ensuring the camera maintains its orientation as you move. For low-to-high reveals while orbiting a character, an “inverted mode” combined with “follow mode” can yield very smooth results. [cite: 2_1, 4_2]
- Camera Movement: Regardless of the type, your camera movement must be smooth, controlled, and deliberate. The speed of the reveal influences its impact – a slow reveal builds more suspense, while a quick one can add urgency.
- Body Mechanics: As with parallax shots, proper footwork is crucial. Use the bent knees and heel-to-toe walking technique to absorb shocks and ensure fluid motion. Keep your elbows close to your sides for added stability, mimicking the smooth motion of a dolly. [cite: 3_1]
- Composition and Timing: Plan your reveal. What are you hiding? What do you want to show first? What is the final reveal? Focus on maintaining consistent framing of the emerging subject as it comes into view.
- Lens Considerations: Wider lenses (e.g., 16mm to 24mm) are often beneficial for reveal shots as they can exaggerate the sense of movement and make the unveiled scene feel grander and more expansive. [cite: 5_3]
When to Deploy the Reveal Shot
Reveal shots are incredibly versatile and can be used in numerous narrative contexts:
- Character Introduction: A slow vertical reveal from feet to face can build anticipation for a new character.
- Establishing a Scene: Unveiling a vast landscape or an intricate interior can immediately set the tone and context for a scene.
- Plot Twist: Revealing a hidden object or a surprising element can be a powerful narrative device.
- Transition: A reveal shot can smoothly transition from one location or idea to another.
Essential Tips for Advanced Gimbal Control
Mastering these advanced techniques goes beyond just knowing the theory; it demands practical application and refined gimbal control.
- Balancing and Calibration: Always ensure your gimbal is perfectly balanced and calibrated before every shoot. An unbalanced gimbal will fight your movements, leading to jerky footage and potential motor strain.
- Footwork and Body Movement: The “ninja walk” is not just a catchy phrase; it’s a fundamental technique. By bending your knees and moving with your entire body, you minimize vertical camera shake, resulting in incredibly smooth tracking and orbital shots. Practicing a consistent, flowing gait is invaluable.
- Two-Handed Grip for Stability: For maximum stability, especially when performing complex moves, always use a two-handed grip. Your dominant hand can manage the joystick and controls, while your other hand supports the gimbal’s base, providing additional support and dampening unwanted movements. [cite: 1_4]
- Practice and Experimentation: There’s no substitute for hands-on practice. Start with simple subjects and gradually increase the complexity of your movements. Experiment with different lenses, focal lengths, and environments to understand how they impact the parallax and reveal effects. Watch tutorials, but most importantly, go out and shoot.
- Use a Monitor: An external monitor attached to your gimbal can greatly assist in maintaining framing and focus, especially when performing complex maneuvers where looking at the camera’s built-in screen might be awkward.
Comparative Table: Parallax vs. Reveal Shot
| Feature | Parallax Shot | Reveal Shot |
|---|---|---|
| Primary Goal | Create depth, emphasize subject, cinematic drama | Build suspense, introduce subject/scene, unveil |
| Camera Movement | Arc/Circle around subject, subject centered | Linear movement (side, up, down, forward/back) from obstruction/detail |
| Gimbal Mode | Pan Follow is typical | Lock Mode, Pan Follow, or Inverted + Follow |
| Focal Length | Longer lenses often preferred (35-70mm) | Wider lenses (16-24mm) can enhance effect, or standard |
| Visual Effect | Background moves faster than foreground | Gradual unveiling, sense of discovery |
| Emotional Impact | Wonder, drama, focus, intensity | Intrigue, suspense, anticipation |
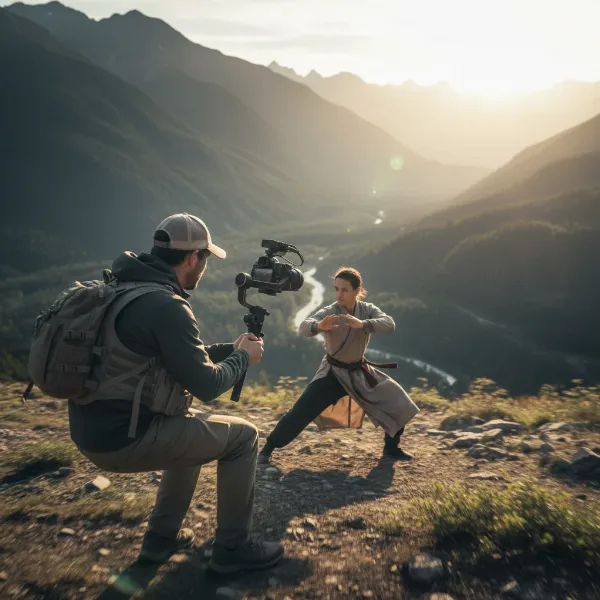 A filmmaker using a gimbal to capture a cinematic parallax shot with a blurred background and a clear foreground subject.
Conclusion
Mastering advanced gimbal techniques like the parallax and reveal shots are game-changers for any videographer or filmmaker aiming to elevate their craft. These techniques move beyond basic stabilization, transforming simple footage into dynamic, engaging cinematic narratives. By understanding the principles of depth and anticipation, applying precise camera and body movements, and choosing the right lens, you can unlock a new level of visual storytelling. The parallax shot adds captivating depth and emphasis, while the reveal shot builds suspense and delivers powerful moments of discovery. Embrace these advanced techniques, dedicate time to practice, and watch as your films gain a professional polish that truly sets them apart. What new stories will you tell with these advanced gimbal techniques?
Frequently Asked Questions
What gimbal modes are best for parallax shots?
For parallax shots, the “Pan Follow Mode” is generally recommended. This mode allows the camera to smoothly follow your horizontal (pan) movement while keeping the tilt and roll axes stable. This enables you to circle your subject while maintaining focus and composition, creating the signature depth effect.
Can I use a smartphone gimbal for these techniques?
Absolutely! Modern smartphone gimbals are highly capable and can be used to achieve both parallax and reveal shots. Many even feature intelligent tracking modes that can simplify keeping your subject centered for parallax. The core principles of smooth movement, good footwork, and understanding composition apply regardless of the camera size.
How do I ensure smooth movements for advanced gimbal shots?
To ensure smooth movements, focus on your body mechanics: bend your knees and walk with a “heel-to-toe” motion to absorb shocks. Maintain a consistent pace and distance from your subject. Holding the gimbal with both hands provides extra stability. Regular practice in various environments will significantly improve your muscle memory and overall fluidity.