Few things are as frustrating for a videographer as capturing what you believe is a perfect shot, only to find the horizon line annoyingly tilted. This unwelcome phenomenon, known as gimbal horizon drift, can quickly turn cinematic aspirations into a shaky reality. Gimbals are designed to provide buttery-smooth, level footage, but when their internal sensors or mechanics go awry, the result is skewed compositions that demand tedious post-production correction. This comprehensive guide will walk you through understanding why horizon drift occurs, diagnosing the problem, and providing step-by-step instructions on how to calibrate your gimbal correctly to restore its precision and ensure your shots always remain perfectly level.
Understanding Gimbal Horizon Drift
What exactly is gimbal horizon drift? It’s the subtle, or sometimes not-so-subtle, tilting of your camera’s horizon even when your gimbal appears to be held level. This translates to slanted footage that undermines the professionalism and stability your gimbal is meant to provide.
Several factors can cause this frustrating issue. At its core, drift often stems from sensor misalignment within the gimbal’s Inertial Measurement Unit (IMU), which includes accelerometers and gyroscopes responsible for detecting orientation and movement. These sensors can be confused by external forces like magnetic interference or even slight physical impacts. Improper camera balancing, outdated firmware with bugs, or even minor mechanical wear and tear on the gimbal’s motors can also contribute to the problem, leading to your horizon gradually (or suddenly) veering off-kilter.
Essential Pre-Calibration Checks
Before you dive into the calibration process, performing a few preliminary checks can save you time and ensure a more effective calibration. These steps address common oversights that often contribute to or exacerbate horizon drift.
First, proper balancing of your camera or smartphone on the gimbal is paramount. This isn’t merely an aesthetic adjustment; a well-balanced setup reduces strain on the gimbal motors, allowing them to function optimally. If your camera is not balanced, the motors will constantly fight against gravity, leading to inconsistent performance and potential drift. Next, always ensure your gimbal has the latest firmware installed. Manufacturers frequently release updates that include bug fixes, performance enhancements, and improved calibration algorithms. Running outdated firmware can leave your gimbal susceptible to known issues. Third, select a flat and stable surface for calibration. The accuracy of any calibration relies heavily on the environment; a tilted or unstable surface will result in an inaccurate baseline, making the drift worse. Lastly, confirm your gimbal’s batteries are fully charged. Calibration requires sustained power, and a low battery could interrupt the process or lead to unreliable sensor readings, compromising the accuracy of the calibration.
Step-by-Step Gimbal Calibration Guide
Correctly calibrating your gimbal is a multi-step process that combines automatic adjustments with potential fine-tuning. Following these steps will help you reset your gimbal’s internal sensors and motor functions for optimal performance.
1. Initial Setup
|
Our Picks for the Best Washing Machine in 2026
As an Amazon Associate I earn from qualifying purchases.
|
||
| Num | Product | Action |
|---|---|---|
| 1 | Avanti Portable Compact Washing Machine for Clothes/Laundry, 0.84 Cu. Ft. Capacity, Standard Sink/Faucet Attachment for Apartment, Dorm, RV, White |

|
| 2 | Giantex Portable Washing Machine, 17.6lbs Compact Washer Spinner Combo with Pump Drain, Twin Tub 11lbs Wash & 6.6lbs Spin, Lavadoras Portatiles for Apartment RV Dorm College (White & Blue) |
|
| 3 | COSTWAY Portable Washing Machine, Twin Tub 26lbs Capacity Laundry, 18lbs Washer and 8lbs Spinner Combo with Timer Knobs, Built-in Drain Pump, Compact Washer for Home Dorm Apartment (Grey+White) |
|
| 4 | Portable Washing Machine - Compact 2.0 Cu.ft Portable Washer, Full-Automatic Top Loader for Space Saving, Ideal for Apartments, Homes, and Dorms, 10 Wash Cycles, Low Noise, IPX4 with Drain Pump |
|
| 5 | Portable Washing Machine,16L Upgraded Large Capacity Portable Washer With 3 Modes Deep Cleaning.Suitable For Travel, Camping,Apartments, Dormitories, Hotels (Green) |
|
| 6 | Giantex Portable Washing Machine, 20lbs Capacity, Twin Tub 2lbs Washer & 8lbs Spinner Combo, Compact for Apartment RV Dorms, Blue & White, GT24267-PE |
|
| 7 | COSTWAY Portable Washing Machine, Twin Tub 26 Lbs Capacity, 18 Lbs Washer and 8 Lbs Spinner, Compact Washer with Control Knobs, Timer Function, Drain Pump, Laundry washer for Apartment RV, Blue |
|
| 8 | COSTWAY Portable Washing Machine, Twin Tub 26lbs Capacity Laundry Washer, 18lbs Washer and 8lbs Spinner Combo with Timer Knobs, Built-in Drain Pump, Compact Washer for Home Dorm Apartment, Blue+White |
|
| 9 | Waterjoy Portable Washing Machines, 7.7 lbs Load Capacity Portable Washer and Dryer Combo with Built-in Barrel Light & LED Display for Household and Apartment (Blue) |
|
| 10 | Giantex Portable Washing Machine, 21lbs Capacity, 14.4lbs Washer and 6.6Llbs Spinner, Compact for Apartment RV, White & Gray, GT-GE-10390US-GR-FP |
|
Begin by powering on your gimbal and, if applicable, connecting it to its companion mobile app. Many modern gimbals from brands like DJI, Zhiyun, and Feiyutech rely on their apps for calibration. Place the gimbal on a perfectly flat, level surface. It is critical that this surface is not only level but also free from vibrations or any nearby metallic objects that could cause magnetic interference.
2. IMU Calibration
The IMU (Inertial Measurement Unit) calibration is a foundational step that resets the gimbal’s internal accelerometers and gyroscopes. These sensors are vital for the gimbal’s understanding of its orientation in space. To perform an IMU calibration, navigate to the system or sensor settings within your gimbal’s app. For DJI drones and gimbals, this is often found under “Safety” or “Advanced Settings.” Follow the on-screen instructions, which typically involve placing the gimbal in specific orientations (e.g., flat, on its side, upside down) and holding it still for a few seconds during each step. This process helps the gimbal learn its true horizontal and vertical axes, eliminating sensor-based drift.
3. Automatic Gimbal Calibration
After IMU calibration, proceed with the automatic gimbal calibration, sometimes called “Auto Tune” or “System Calibration.” This process optimizes the performance of the gimbal’s motors based on the weight and balance of your camera setup. In your gimbal app, look for “Gimbal Auto Calibration” or a similar option. Once initiated, the gimbal will typically move through a series of self-adjustments, testing its range of motion and motor responses. During this critical phase, do not touch or move the gimbal. Allow it to complete its cycle undisturbed, which usually takes a minute or two. This calibration ensures the motors are working harmoniously to maintain a level horizon and smooth movements.
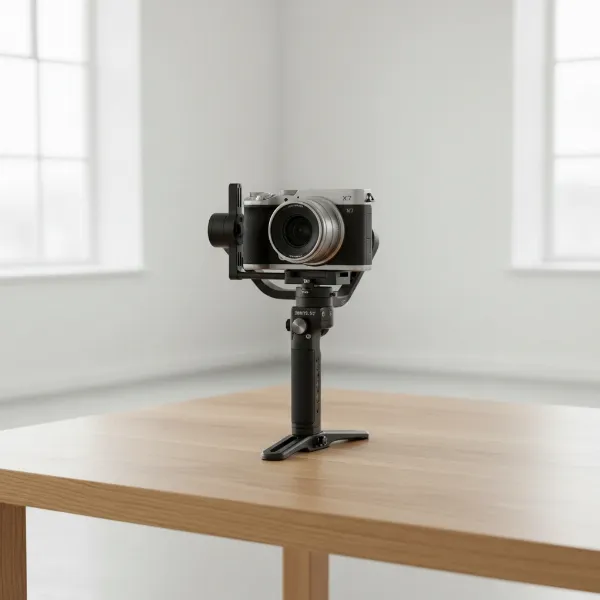 A gimbal with a camera mounted, placed on a perfectly flat table during calibration.
4. Manual Horizon Adjustment (Fine-Tuning)
Even after IMU and automatic gimbal calibrations, you might sometimes observe a slight, persistent tilt in the horizon. Many gimbals offer a manual adjustment feature to correct this. Within the gimbal settings of your app, look for an option like “Gimbal Roll Adjustment” or “Horizontal Fine-Tune.” This allows you to incrementally adjust the roll axis left or right until the horizon appears perfectly level in your camera’s live view. Some gimbals, particularly drone controllers like certain DJI models, allow for on-the-fly manual adjustments using a button-and-wheel combination (e.g., holding C2 and scrolling the right wheel) for quick corrections during operation. This manual step is crucial for achieving truly flawless horizon alignment.
Common Causes of Drift & How to Prevent Them
Understanding the root causes of gimbal horizon drift can help you prevent it from recurring, saving you valuable time and frustration. Proactive maintenance and careful handling are key.
One significant culprit is magnetic interference. Gimbals contain sensitive magnetic sensors that can be easily affected by nearby magnets, speakers, power lines, or even certain electronic devices. Always operate and calibrate your gimbal in an environment free from such disturbances. Improper balancing remains a primary cause; a poorly balanced camera puts undue stress on the gimbal’s motors, leading to drift. Make it a habit to meticulously balance your camera or smartphone on all axes every time you set up your gimbal.
“A well-calibrated gimbal is the cornerstone of professional-looking footage; overlooking basic balancing can negate all its technological prowess.” – Alex Chen, Professional Cinematographer
Physical impact or drops, even minor ones, can jar internal components and sensors, throwing off alignment. Handle your gimbal with care and transport it in a protective case. Temperature fluctuations can also affect sensor performance. Allow your gimbal to acclimate to a new environment’s temperature before use, especially in extreme heat or cold. Finally, ensure you regularly perform firmware updates. Manufacturers continually refine their gimbal software, and keeping yours updated helps iron out any bugs that might cause drift. Avoiding overloading your gimbal beyond its specified payload capacity is also essential, as it can strain motors and sensors.
When to Calibrate & When to Seek Professional Help
Knowing when to calibrate and when your gimbal needs more serious attention is crucial for maintaining its longevity and performance.
You should perform a full calibration (IMU and automatic gimbal calibration) whenever you:
- Notice consistent horizon drift.
- Update your gimbal’s firmware.
- Attach a new camera or a significantly different lens/accessory setup that changes the balance.
- Experience a drop or significant impact to the gimbal.
- Travel to a different geographical location, as environmental magnetic fields can vary.
If, after multiple attempts at proper calibration, including firmware updates and careful balancing, your gimbal’s horizon continues to drift or displays unusual behavior, it might indicate a more serious hardware issue. In such cases, performing a factory reset (if available) can sometimes resolve deep-seated software glitches. However, if the problem persists, it’s best to contact the manufacturer’s customer support. They can provide advanced troubleshooting, advise on potential repairs, or guide you through warranty claims. Do not attempt to open or repair the gimbal yourself, as this can void your warranty and potentially cause further damage.
Conclusion
Mastering the art of gimbal calibration is fundamental for any videographer aiming to capture smooth, perfectly level footage. Horizon drift, while frustrating, is often a solvable problem through careful diagnosis and precise calibration techniques. By understanding its causes, meticulously balancing your gear, regularly updating firmware, and systematically performing IMU and automatic gimbal calibrations, you can maintain your gimbal’s accuracy. Remember, the goal is to empower your creative vision, not to battle your equipment. With these troubleshooting steps, you can ensure your gimbal remains a reliable tool, consistently delivering the stable, cinematic shots you envision. What’s the most challenging gimbal issue you’ve ever faced, and how did you resolve it?
Frequently Asked Questions
Why does my gimbal horizon drift?
Gimbal horizon drift typically occurs due to misaligned internal sensors (IMU), magnetic interference from nearby electronics, improper camera balancing, outdated firmware, or minor physical impacts. These factors can confuse the gimbal’s ability to accurately maintain a level horizon.
How often should I calibrate my gimbal?
You should calibrate your gimbal whenever you notice horizon drift, after firmware updates, when you change your camera setup significantly, or if the gimbal experiences any physical impact. Some users also calibrate before critical shoots or after traveling to new locations.
What is the difference between IMU and gimbal calibration?
IMU (Inertial Measurement Unit) calibration resets the gimbal’s internal accelerometers and gyroscopes, teaching it its true orientation in space. Gimbal calibration, on the other hand, optimizes the motors’ performance to handle your specific camera setup’s weight and balance, ensuring smooth and level movements.
Can I fix gimbal drift in post-production?
While minor horizon drift can sometimes be corrected in post-production software, it often involves cropping the footage to hide the tilted edges, which can reduce your video’s resolution or framing. It’s always best to fix drift at the source through proper gimbal calibration for the highest quality results.
Is gimbal balancing the same as calibration?
No, balancing and calibration are distinct but equally important steps. Balancing involves physically adjusting your camera on the gimbal until it sits level without motor power. Calibration is a software-based process that fine-tunes the gimbal’s sensors and motors to maintain that balance and ensure accurate stabilization.