Crafting cinematic, smooth footage often feels like a privilege reserved for those with limitless budgets. The reality is, professional-grade camera stabilization can be incredibly expensive, with top-tier gimbal setups easily costing thousands of dollars. But what if you could achieve those coveted fluid shots without breaking the bank? This comprehensive guide will show you exactly how to build a highly effective, professional gimbal rig for under $1000, empowering filmmakers and content creators to elevate their production quality on a budget. We’ll demystify the components, compare affordable options, and walk you through the assembly process, proving that a modest investment can yield genuinely stunning results.
Understanding Gimbal Rigs and Components
A professional gimbal rig is more than just a camera stabilizer; it’s a modular system designed to give filmmakers precise control and seamless movement, transforming shaky handheld footage into polished, cinematic sequences. At its core, a gimbal uses motorized axes to counteract unwanted camera movements, keeping your shots incredibly steady.
What is a Professional Gimbal Rig?
A professional gimbal rig refers to a complete camera setup that integrates a motorized gimbal stabilizer with various accessories like cages, handles, and power solutions, all tailored to provide optimal ergonomics and functionality for serious video production. Unlike a standalone gimbal, a “rig” implies a customizable system built around your camera, offering enhanced control, accessory mounting options, and prolonged shooting comfort. The goal is to create a cohesive unit that feels like an extension of the operator, allowing for dynamic and complex camera movements with consistent stability.
Essential Components of a Budget-Friendly Gimbal Rig
Building an effective rig means understanding its individual parts and how they work together. For a sub-$1000 professional setup, focus on these core components:
- Camera Cage: This metal frame encloses your camera, protecting it and providing numerous mounting points (1/4″-20 and 3/8″-16 threads, NATO rails, cold shoes) for accessories. It’s the foundation upon which you’ll build your rig.
- Gimbal Stabilizer (Motorized 3-axis): This is the heart of your rig, using brushless motors to stabilize your camera across three axes (pan, tilt, roll). For our budget, we’ll look at compact, high-performance models designed for mirrorless and smaller DSLR cameras.
- Handles/Grips: Essential for comfortable operation, especially during long shoots or for achieving low-angle shots. Options include single-handle grips, dual-handgrips, and specialized sling handles that integrate directly with your gimbal or cage.
- Counterweights: Used to perfectly balance your camera on the gimbal, especially when using heavier lenses or adding external accessories. Proper balancing is crucial for optimal stabilization and motor performance.
- Quick Release Plates: These allow for rapid attachment and detachment of your camera from the gimbal, tripod, or other rig components, significantly speeding up workflow.
- Mounting Accessories: Small arms, clamps, magic arms, and cold shoe mounts expand your rig’s versatility, enabling you to attach monitors, microphones, and lights.
- Battery Solutions: While most gimbals have built-in batteries, external power options or additional batteries for your camera and accessories are often necessary for extended shooting.
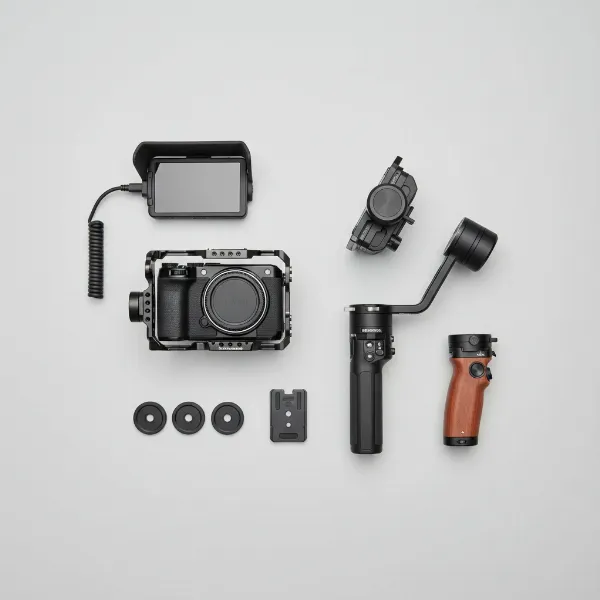 Visualizing essential components of an affordable professional gimbal rig setup.
Selecting Your Core Gimbal System (Under $1000 Focus)
The most significant investment in your rig will be the gimbal stabilizer itself. Fortunately, many excellent options exist that deliver professional results without requiring a professional price tag.
Pre-built Gimbal Stabilizers vs. Modular DIY
When building a gimbal rig, you essentially have two paths:
- Pre-built Stabilizers: These are integrated units like the DJI RS series or Zhiyun Crane series that come with a built-in handle and control system. They are often the most straightforward way to get started and many models fit well within a sub-$1000 budget. You then add a camera cage and other accessories around this core gimbal.
- Modular DIY: This approach involves sourcing individual gimbal motors and controllers and assembling them into a custom frame. While it offers ultimate customization, it’s significantly more complex, requires advanced technical knowledge, and often doesn’t save money compared to off-the-shelf gimbals when aiming for “professional” stability. For this guide, we’ll focus on integrating high-value pre-built gimbals into a modular rig.
Key Factors for Choosing a Gimbal Head
When selecting a gimbal stabilizer that forms the core of your professional rig, keep these critical considerations in mind:
- Payload Capacity: This is paramount. Ensure the gimbal can comfortably support the combined weight of your camera body, lens, and any planned on-camera accessories (e.g., small monitor, microphone). Overloading a gimbal leads to poor stabilization and can damage the motors. Many budget gimbals handle 2-3 kg (4.4-6.6 lbs), suitable for most mirrorless setups.
- Battery Life: Longer battery life means fewer interruptions during shoots. Most modern gimbals offer 10-15 hours, which is excellent for a full day’s work. Look for fast-charging capabilities.
- Stabilization Modes: Ensure the gimbal offers standard modes like Pan Follow, Tilt-Lock, and FPV (First Person View) to cover diverse shooting scenarios. Advanced features like sport mode for fast action or inception mode for rolling shots are a bonus.
- Ease of Balancing: A well-designed gimbal should allow for relatively quick and precise balancing, which is crucial for optimal performance. Look for gimbals with clear markings and robust locking mechanisms.
- Connectivity (App Control): Most gimbals come with a companion smartphone app for fine-tuning settings, controlling movements, and performing firmware updates. A reliable app enhances functionality.
For under $500, popular and highly recommended gimbals include the Zhiyun WEEBILL-3 S, FeiyuTech Scorp 2, DJI RS 4 Mini, and Zhiyun Cinepeer Crane 4E. These options offer excellent stabilization and features for their price point.
Building Your Modular Gimbal Rig: Step-by-Step
Once you’ve chosen your core gimbal, it’s time to assemble the rest of your professional rig. This modular approach maximizes versatility and comfort while keeping costs down.
1. Start with Your Camera Cage
The camera cage is the skeleton of your rig. It bolts securely to your camera’s tripod mount and often a top hot shoe for extra stability. Brands like SmallRig and Niceyrig offer excellent, affordable cages for a wide range of mirrorless and DSLR cameras. Choose a cage specifically designed for your camera model to ensure a perfect fit and access to all ports and buttons. A good cage provides multiple 1/4″-20 and 3/8″-16 mounting points, as well as NATO rails, which are perfect for attaching handles.
2. Integrate the Gimbal Stabilizer
Mount your camera (now housed in its cage) onto the gimbal’s quick release plate. This plate typically slides onto the gimbal’s mounting arm. Take your time to carefully balance the camera on each axis (tilt, roll, and pan). This step is crucial: a perfectly balanced camera allows the gimbal motors to work efficiently, saving battery life and delivering the smoothest footage. Many gimbals include clear markings and quick-release levers to assist with balancing.
3. Add Handles and Grips
To enhance stability and ergonomic control, attach additional handles.
- Top Handle: If your gimbal doesn’t have an integrated top handle, a standalone one mounted to your cage can provide an excellent grip for low-angle shots and easier transportation.
- Side Handles (NATO Rail): A side handle attached to a NATO rail on your cage offers a comfortable grip for two-handed operation, reducing fatigue and increasing control, especially when navigating complex movements. Some gimbals, like the FeiyuTech Scorp 2, come with a dual-grip design, negating the need for separate side handles.
4. Strategic Counterweighting
When adding heavier lenses or accessories (like an external monitor) to your camera, you may need counterweights to re-balance the gimbal. These are small weights that attach to specific points on the gimbal or cage to ensure the center of gravity is perfectly aligned. This reduces strain on the motors and improves stabilization performance.
5. Powering Your Rig
While your camera and gimbal have their own batteries, a professional setup often benefits from additional power. Consider:
- External Battery for Camera: A V-mount or NP-F style battery mounted to your cage can power your camera for hours, bypassing the camera’s internal battery.
- Power Hubs: Smallrig and similar brands offer power distribution hubs that allow you to power multiple accessories (monitor, wireless video transmitter) from a single external battery.
6. Essential Accessories
Rounding out your rig with essential accessories enhances its functionality without exceeding your budget.
- External Monitor: A small, affordable 5-inch monitor (e.g., Feelworld, Andycine) mounted via a magic arm provides a clearer view of your footage than the camera’s built-in screen, especially helpful for framing and critical focus.
- Microphone: A compact on-camera shotgun microphone (e.g., Rode VideoMicro) or a wireless lavalier system will significantly improve your audio quality.
- LED Fill Light: A small, dimmable LED light can be invaluable for interviews or fill light in tricky lighting conditions.
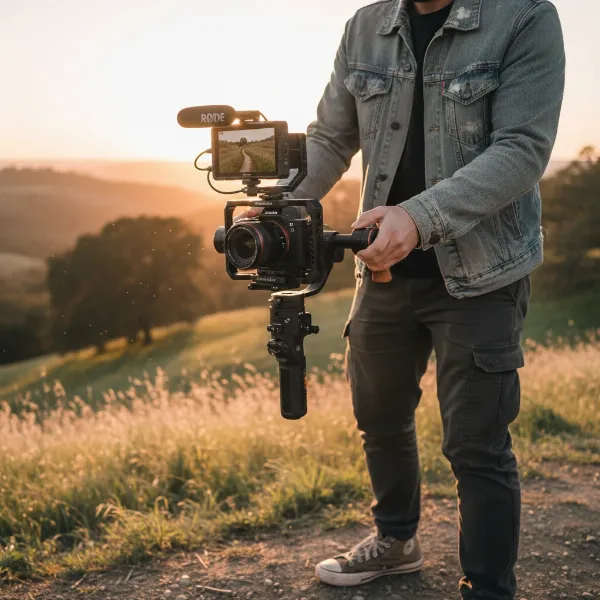 Professional filmmaker using an assembled budget gimbal rig for smooth cinematic shots.
Budget Breakdown: How to Stay Under $1000
Building a professional gimbal rig on a tight budget requires smart choices. Here’s an estimated cost breakdown and tips for saving:
| Component | Estimated Cost Range | Tips for Saving |
|---|---|---|
| Gimbal Stabilizer | $300 – $450 | Look for sales, older models (e.g., DJI RS 3 Mini), or refurbished units. |
| Camera Cage | $80 – $150 | SmallRig and Niceyrig offer excellent value. Buy specific to your camera. |
| Handles/Grips | $50 – $100 | Start with a basic side handle. Many gimbals include a mini-tripod handle. |
| Quick Release Plates | $20 – $50 | Often included with cages or gimbals. Falcam offers versatile systems. |
| Counterweights | $15 – $30 | Essential for balancing heavy lenses; a small investment. |
| External Monitor (basic) | $150 – $250 | Look for brands like Feelworld or Andycine; buy used if possible. |
| On-camera Microphone | $50 – $100 | Rode VideoMicro or similar compact shotgun mics offer great audio for the price. |
| Mounting Accessories | $20 – $50 | Magic arms, cold shoe mounts; buy a small kit. |
| Total Estimated Cost | $685 – $1130 |
By carefully selecting components, leveraging sales, and prioritizing what’s essential for your immediate needs, it’s entirely feasible to assemble a powerful, professional gimbal rig well within the $1000 limit. Consider buying used accessories to further stretch your budget.
Optimizing Your Gimbal Rig for Professional Results
Having the right gear is only half the battle; knowing how to use and maintain it is what truly brings professional results.
Mastering Balance for Smooth Footage
Perfect balance is non-negotiable for professional gimbal work. Spend time carefully balancing your camera and lens setup on all three axes until the camera holds its position perfectly even when the gimbal is off. This minimizes motor strain and ensures the smoothest possible footage. A well-balanced setup is quieter, more efficient, and extends battery life.
Practice Movement and Panning Techniques
Even with a perfectly balanced gimbal, your movement as an operator is key. Practice smooth starts and stops, walking techniques (e.g., “ninja walk” or “Gimli walk” to minimize vertical bounce), and controlled pans and tilts. Experiment with different gimbal modes to understand how they affect movement and choose the best one for your shot. Smooth, intentional movements differentiate professional footage from amateur.
Firmware Updates and Calibration
Regularly check for firmware updates for your gimbal. Manufacturers frequently release updates that improve motor performance, add new features, or fix bugs. After any significant setup change or firmware update, recalibrate your gimbal using its companion app or built-in menu to ensure optimal performance.
Maintenance for Longevity
Keep your gimbal clean, especially the motor joints and quick-release plates. Dust and debris can impair smooth operation. Store your gimbal properly, ideally in its original case, to protect it during transport. Charge the batteries regularly, even when not in use, to maintain their health. Proper maintenance ensures your investment continues to deliver professional results for years.
“A well-built gimbal rig isn’t just about stabilization; it’s about unlocking creative camera movements that tell a more compelling story, all achievable without breaking the bank.”
Conclusion
Building a professional gimbal rig for under $1000 is not only possible but a highly rewarding endeavor for any serious filmmaker or content creator. By understanding the essential components, making informed choices on budget-friendly yet high-performing gimbals, and thoughtfully assembling your modular system, you can achieve cinematic stability and creative flexibility previously thought to be out of reach. Remember, the true magic lies in mastering the tools and continuously refining your operating techniques. Don’t let budget constraints limit your creative vision; equip yourself with an affordable, professional gimbal rig and start capturing breathtaking footage today.
What kind of professional footage are you most excited to capture with your new budget-friendly gimbal rig?
Frequently Asked Questions
Can a gimbal rig under $1000 truly be considered “professional”?
Yes, absolutely. With advancements in technology, many gimbals and accessories in the $300-$500 range offer excellent stabilization and features suitable for professional video production with mirrorless or smaller DSLR cameras. The “professional” aspect comes from proper assembly, balancing, and skilled operation, not just the price tag.
What’s the most crucial component to invest in when on a budget?
The gimbal stabilizer itself is the most critical investment. A high-quality gimbal (like the DJI RS 4 Mini or Zhiyun WEEBILL-3 S) ensures superior stabilization performance, which is the primary function of the rig. Once you have a capable gimbal, you can build around it with more affordable accessories.
Is it difficult to balance a camera on a gimbal?
Balancing a camera on a gimbal requires patience and practice but is not inherently difficult. Most gimbals have intuitive designs with adjustable arms and locking mechanisms. Following the manufacturer’s instructions and spending time on this step will ensure optimal performance and greatly improve your footage quality.
Can I use my existing camera with a budget gimbal rig?
Most modern mirrorless cameras and smaller DSLRs are compatible with budget gimbals, provided their combined weight (camera + lens) falls within the gimbal’s payload capacity. Always check the gimbal’s specifications and your camera’s weight to ensure compatibility before purchasing.
What kind of camera is best for a budget gimbal setup?
Compact mirrorless cameras (e.g., Sony Alpha series, Fujifilm X-T series, Canon R series) are generally ideal for budget gimbal setups due to their lighter weight and excellent video capabilities, making them easier to balance and operate within the payload limits of more affordable gimbals.