Long exposure photography captivates with its ability to transform fleeting moments into ethereal, dreamy scenes. Traditionally, this technique demands absolute stillness, a domain where the trusty tripod reigns supreme. However, in the dynamic world of modern photography, the gimbal — a marvel of stabilization engineering — is opening new doors, allowing photographers to explore “motion long exposure” and redefine creative boundaries. While not a direct replacement for a tripod in every scenario, understanding how to integrate a gimbal into your long exposure workflow can unlock captivating visual narratives that static shots simply cannot achieve.
Gimbal vs. Tripod: Clarifying Roles in Long Exposure
Before diving into techniques, it’s crucial to distinguish the primary functions of gimbals and tripods in photography, especially concerning long exposure. A tripod provides static stability, anchoring your camera in a fixed position to ensure zero movement over extended shutter times. This absolute immobility is essential for traditional long exposures, capturing sharp static elements and rendering moving subjects, like water or clouds, into smooth blurs.
Conversely, a gimbal’s core purpose is dynamic stabilization. Equipped with motors and gyroscopes, it smooths out camera shake during movement, making it indispensable for fluid video footage and handheld dynamic stills. For very long exposures, where even the slightest tremor can introduce blur, a handheld gimbal cannot offer the same unwavering stillness as a tripod. However, this distinction is precisely where its unique potential lies: enabling controlled motion within a long exposure, rather than striving for perfect stasis.
When a Gimbal Elevates Your Long Exposure Photography
While a gimbal won’t replace a tripod for every long exposure, it shines in specific, creative applications, adding a unique dimension to your work.
Captivating Motion Long Exposure and Time-Lapses
This is where the gimbal truly transforms long exposure. Instead of a static frame, you can introduce subtle, precisely controlled camera movements over an extended period. Imagine a cityscape at night, where car lights streak across the frame, but the entire scene slowly pans or tilts, revealing a wider vista of light trails. This “motion time-lapse” effect is achievable by programming your gimbal to execute slow, deliberate movements while your camera captures successive long exposure frames. The result is a cinematic blend of time compression and spatial shift, creating a truly mesmerizing visual.
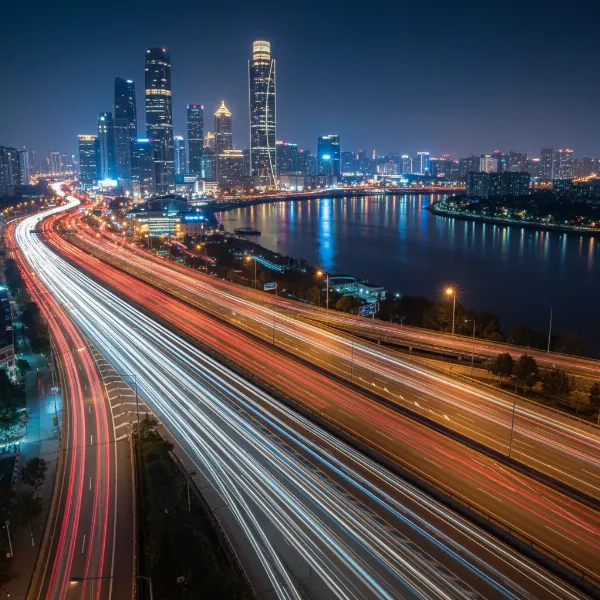 City night scene with car light trails and a subtle motion long exposure effect.
Enhancing Smartphone Long Exposure
Modern smartphones often feature impressive night modes and dedicated long exposure settings. When combined with a smartphone gimbal, these capabilities can be surprisingly effective. For shorter long exposures (e.g., 2-5 seconds), the gimbal’s stabilization can help reduce handheld shake, especially in low-light environments. For ultra-long exposures, however, it is highly recommended to place your smartphone gimbal on a stable surface or a dedicated tripod. This hybrid approach leverages the phone’s software and the gimbal’s fine control for precise framing, while relying on a rigid support for the necessary stillness. You can lock the gimbal’s axes to prevent unintentional movement, focusing on the phone’s internal stabilization and exposure settings.
Gimbal Heads for Heavy Telephoto Lenses
It’s important to clarify that “gimbal heads” are distinct from electronic camera gimbals. A gimbal head is a type of tripod head designed to perfectly balance large, heavy telephoto lenses, often used in wildlife or sports photography. While mounted on a tripod, these heads allow for incredibly smooth, effortless panning and tilting, making it easier to track fast-moving subjects. While their primary use isn’t traditional long exposure, they are crucial for maintaining stability and agility with cumbersome setups, even if the shutter speeds are not typically “long exposure” in the classic sense for capturing motion blur. Their value here is in ergonomic handling and precise subject tracking rather than extended exposure times.
Essential Setup for Motion Long Exposure with a Gimbal
To venture into motion long exposure, meticulous setup and understanding of both your camera and gimbal are paramount.
Balancing and Calibrating Your Gimbal
First, ensure your camera and lens combination is perfectly balanced on your gimbal. This involves adjusting the camera’s position on all three axes until it remains level and still when the motors are off. Proper balancing reduces strain on the motors, conserves battery life, and ensures the smoothest possible movements. After balancing, calibrate the gimbal according to the manufacturer’s instructions. This teaches the gimbal to understand the weight and balance of your setup, optimizing its stabilization performance.
Camera Settings for Long Exposure
The foundation of any long exposure shot lies in your camera settings. For motion long exposure, these settings are even more critical.
- Shutter Speed: This will be your primary control for the “long exposure” effect. Start with shutter speeds from a few seconds to several minutes, depending on the desired blur and ambient light.
- ISO: Keep your ISO as low as possible (e.g., ISO 100 or 200) to minimize noise, especially during extended exposures.
- Aperture (f-stop): Use a narrower aperture (e.g., f/8 to f/16) to increase your depth of field and allow for longer shutter speeds in brighter conditions.
- Neutral Density (ND) Filters: These are indispensable for long exposure photography, especially during the day. ND filters reduce the amount of light entering the lens without affecting color, allowing you to achieve very long shutter speeds even in bright conditions. A variable ND filter can offer flexibility for different light levels.
- Manual Focus: Set your lens to manual focus and achieve sharp focus on your main subject before starting the exposure. This prevents the camera from “hunting” for focus during the shot.
Programming Gimbal Movements
Many modern gimbals offer programmable motion features, often accessible through a companion app or the gimbal’s onboard controls. You can set start and end points for pan, tilt, and even roll axes, along with the duration of the movement. For motion long exposure time-lapses, you would typically program a very slow, continuous movement to occur between each frame or during a single very long exposure, depending on your camera’s intervalometer settings and desired effect. Experiment with subtle, gradual movements to create a smooth, almost imperceptible shift in perspective.
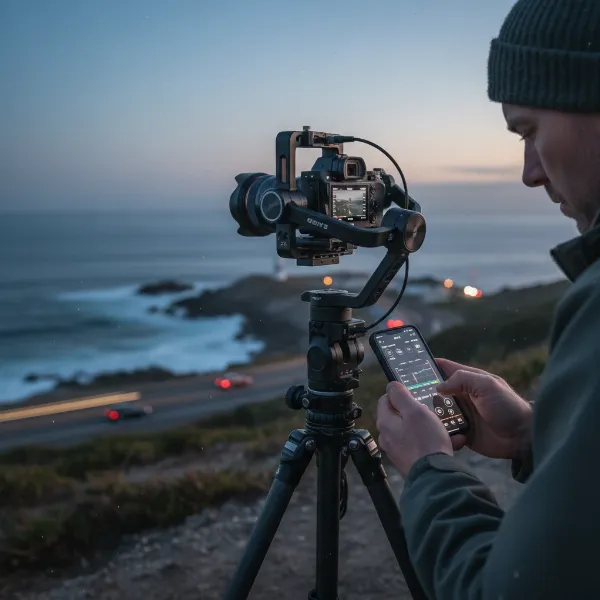 Photographer programming a gimbal for a long exposure time-lapse sequence.
Creative Techniques with a Gimbal for Long Exposure
Beyond static shots, gimbals unlock a spectrum of creative possibilities:
- Light Trails with a Dynamic Background: Position your camera for city nightscapes with moving vehicles. Program a slow, continuous pan or tilt with your gimbal. The moving lights will create vibrant streaks, while the static background (buildings) will appear sharper, but the overall composition will subtly shift, adding a unique dynamic element.
- Ethereal Landscapes with Moving Clouds: In landscapes with fast-moving clouds, a slow, upward tilt or a horizontal track can add an extra layer of dynamism to the already blurred cloud patterns, drawing the viewer’s eye across the scene.
- Subtle Object Tracking: Imagine a long exposure of a flowing river, where you use the gimbal to slowly track a floating leaf or a small boat. The background water will blur into silk, but the tracked object will have a slightly more defined, yet still ethereal, presence. This creates a sense of focused motion within the blur.
Tips for Success
Achieving exceptional motion long exposure shots with a gimbal requires patience and precision:
- Use a Sturdy Base: Always mount your gimbal on a robust tripod or a very stable surface for any long exposure exceeding a few seconds, even with phone gimbals.
- Remote Shutter Release: Minimize camera shake by using a remote shutter release or the camera’s self-timer function to trigger the exposure, preventing direct contact with the camera.
- Test and Experiment: The interplay between shutter speed, ND filters, and gimbal movement requires practice. Take numerous test shots, adjusting settings incrementally until you achieve the desired effect.
- Monitor Battery Life: Gimbals consume power, especially when performing programmed movements. Ensure your gimbal and camera batteries are fully charged, or have spares on hand.
- Post-Processing: Long exposure images often benefit from post-processing to enhance contrast, color, and sharpness, bringing out the intricate details and smooth blurs.
Limitations and When to Choose a Tripod
It’s important to reiterate that for absolute, unwavering stillness, a traditional tripod remains the superior choice for long exposure photography. If your goal is razor-sharp static elements against blurred motion (e.g., a perfectly still waterfall with silky water), a gimbal alone will not suffice for longer exposures. Gimbals introduce a slight, albeit stabilized, drift or movement that will become apparent in very long exposures.
A gimbal is best for:
- Introducing intentional, controlled motion into long exposures.
- Stabilizing smartphones for shorter handheld long exposures.
- Creating motion time-lapses.
A tripod is best for:
- Any long exposure requiring perfect stillness.
- Heavy camera setups where motion is not desired.
- Time-lapses without camera movement.
Conclusion
The fusion of gimbals and long exposure photography opens up an exciting frontier for creative expression. While not intended to replace the fundamental stability of a tripod for traditional long exposures, a gimbal empowers photographers to infuse their extended exposures with dynamic, controlled movement, transforming scenes into cinematic narratives. By mastering the delicate balance of camera settings and programmed gimbal motion, you can capture ethereal light trails, dynamic landscapes, and motion time-lapses that possess a truly unique character. So, are you ready to unlock new dimensions in your long exposure photography by embracing the power of controlled movement?
Frequently Asked Questions
Can I really get sharp long exposure photos while holding a gimbal?
For traditional, perfectly sharp long exposures, a tripod is essential. A handheld gimbal provides remarkable stabilization for dynamic shots and video, but for exposures longer than a few seconds, it cannot entirely eliminate the subtle movements inherent in human handholding, leading to some blur in static elements. For best results, place the gimbal on a stable surface or tripod for long exposures.
What kind of gimbal is best for motion long exposure time-lapses?
Look for gimbals with programmable motion control features, often allowing you to set start and end points for pan, tilt, and even roll movements. These are typically larger, professional-grade electronic gimbals designed for DSLRs or mirrorless cameras, though some advanced smartphone gimbals also offer similar functions.
Do I still need ND filters if I’m using a gimbal for long exposure?
Yes, absolutely. ND filters are crucial for long exposure photography regardless of your stabilization method. They reduce the amount of light entering your lens, enabling you to use longer shutter speeds in bright conditions without overexposing your image, which is vital for achieving the characteristic motion blur effect.
What are some common mistakes to avoid when attempting gimbal long exposure?
A common mistake is expecting a handheld gimbal to provide absolute tripod-like stillness for very long exposures. Other pitfalls include neglecting proper gimbal balancing, not using a remote shutter, forgetting ND filters in bright conditions, and failing to program movements that are slow and deliberate enough for a smooth effect.