Modern systems, from your home thermostat to complex industrial machinery, rely on precise control to operate efficiently and reliably. At the heart of this precision lie two often-misunderstood parameters: deadband and sensitivity. These settings dictate how a system reacts to changes, profoundly influencing its stability, energy consumption, and overall responsiveness. Understanding and correctly configuring them is key to unlocking optimal performance and preventing common operational headaches. This article will demystify deadband and sensitivity, exploring their definitions, applications, and the critical balance required for effective control.
Unraveling Deadband: The Zone of Inactivity
Deadband, also sometimes referred to as hysteresis or differential, defines a specific range around a desired set point where a system’s output remains unchanged despite minor fluctuations in its input. Imagine a buffer zone: as long as the measured variable stays within this zone, the control system takes no action. This intentional inactivity is a cornerstone of stable and efficient system operation.
Why is Deadband Crucial for Your Systems?
The primary purpose of deadband is to prevent rapid cycling, often called “chattering,” which occurs when a system repeatedly turns on and off in response to small, insignificant changes. Without deadband, a thermostat set to 70°F might constantly switch a furnace on at 69.9°F and off at 70.1°F, leading to several detrimental effects:
- Reduced Wear and Tear: Frequent cycling places immense stress on mechanical components like motors, compressors, and relays, significantly shortening their lifespan. Deadband reduces this stress by allowing components to operate for longer, uninterrupted periods.
- Enhanced Energy Efficiency: Each start-up cycle for machinery, like an HVAC unit, often consumes a surge of energy. By minimizing these cycles, deadband directly contributes to lower energy consumption and reduced utility bills.
- Increased System Stability: Constant on-off switching creates instability and can introduce noise into a system. Deadband fosters a smoother, more predictable operation by ignoring minor disturbances.
- Fewer Nuisance Alarms: In industrial control systems, minor process fluctuations are normal. A well-configured deadband filters out these insignificant variations, preventing a flood of false alarms that can desensitize operators to genuine issues.
|
Our Picks for the Best Washing Machine in 2026
As an Amazon Associate I earn from qualifying purchases.
|
||
| Num | Product | Action |
|---|---|---|
| 1 | Portable Washing Machine,16L Upgraded Large Capacity Portable Washer With 3 Modes Deep Cleaning.Suitable For Travel, Camping,Apartments, Dormitories, Hotels (Green) |

|
| 2 | Giantex Portable Washing Machine, 21lbs Capacity, 14.4lbs Washer and 6.6Llbs Spinner, Compact for Apartment RV, White & Gray, GT-GE-10390US-GR-FP |
|
| 3 | Waterjoy Portable Washing Machines, 7.7 lbs Load Capacity Portable Washer and Dryer Combo with Built-in Barrel Light & LED Display for Household and Apartment (Blue) |
|
| 4 | Avanti Portable Compact Washing Machine for Clothes/Laundry, 0.84 Cu. Ft. Capacity, Standard Sink/Faucet Attachment for Apartment, Dorm, RV, White |
|
| 5 | COSTWAY Portable Washing Machine, Twin Tub 26lbs Capacity Laundry Washer, 18lbs Washer and 8lbs Spinner Combo with Timer Knobs, Built-in Drain Pump, Compact Washer for Home Dorm Apartment, Blue+White |
|
| 6 | Giantex Portable Washing Machine, 20lbs Capacity, Twin Tub 2lbs Washer & 8lbs Spinner Combo, Compact for Apartment RV Dorms, Blue & White, GT24267-PE |
|
| 7 | COSTWAY Portable Washing Machine, Twin Tub 26 Lbs Capacity, 18 Lbs Washer and 8 Lbs Spinner, Compact Washer with Control Knobs, Timer Function, Drain Pump, Laundry washer for Apartment RV, Blue |
|
| 8 | Giantex Portable Washing Machine, 17.6lbs Compact Washer Spinner Combo with Pump Drain, Twin Tub 11lbs Wash & 6.6lbs Spin, Lavadoras Portatiles for Apartment RV Dorm College (White & Blue) |
|
| 9 | Portable Washing Machine - Compact 2.0 Cu.ft Portable Washer, Full-Automatic Top Loader for Space Saving, Ideal for Apartments, Homes, and Dorms, 10 Wash Cycles, Low Noise, IPX4 with Drain Pump |
|
| 10 | COSTWAY Portable Washing Machine, Twin Tub 26lbs Capacity Laundry, 18lbs Washer and 8lbs Spinner Combo with Timer Knobs, Built-in Drain Pump, Compact Washer for Home Dorm Apartment (Grey+White) |
|
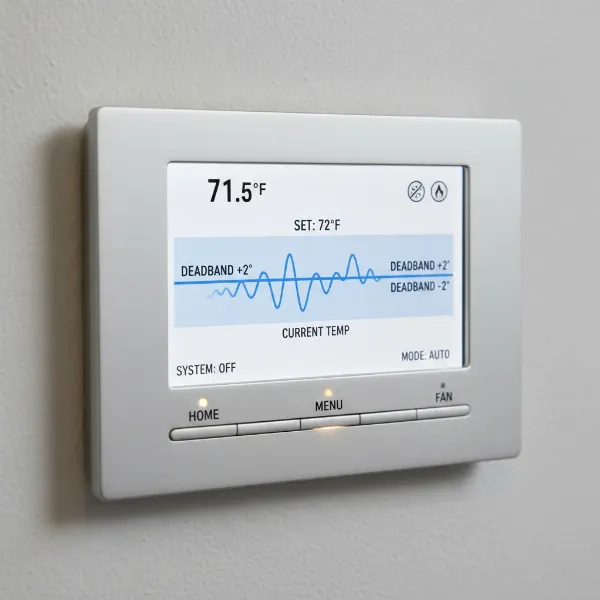 An illustration of a thermostat's deadband, showing temperature fluctuations within a set range where the HVAC system remains inactive.
Adjusting Deadband Settings: Finding the Right Balance
The impact of deadband settings is significant:
- Wider Deadband: This results in fewer system cycles, saving energy and reducing wear. However, it also means the actual process variable will deviate further from the set point before correction, potentially leading to less precise control or comfort.
- Narrower Deadband: This provides tighter control, keeping the variable closer to the set point. The trade-off is increased cycling, higher energy consumption, and potentially faster wear on components.
In many electronic systems, deadband can be adjusted digitally. For mechanical pressure switches, it’s typically the difference between the set point (where it activates) and the reset point (where it deactivates). Some deadbands are fixed by the manufacturer, while others offer field adjustability, allowing optimization for specific applications.
For instance, in a Distributed Control System (DCS), a deadband for pressure or liquid level parameters might be recommended at 1% to 5% of the full scale. This range is designed to filter out typical environmental vibrations and minor fluctuations, ensuring that alarms are only triggered by operationally critical deviations.
Decoding Sensitivity: Responsiveness and Precision
While deadband governs when a system doesn’t react, sensitivity dictates how much it reacts when it does. The term “sensitivity” carries different nuances depending on the context, but at its core, it describes the degree of response to a change in input or conditions.
What Does Sensitivity Mean in Control?
- In Control Engineering: More formally, sensitivity measures how much a control system’s output or overall performance is affected by variations in its internal parameters (like component aging) or external disturbances. A good control system should ideally be insensitive to internal variations (to maintain stability) but sensitive to the intended input signals (to respond accurately).
- In User Interfaces and Devices: In a more colloquial sense, sensitivity often refers to how responsive a control input is to a user’s action. For example, a “high sensitivity” mouse moves the cursor a great distance with a small physical movement.
Why is Sensitivity a Key Parameter?
Sensitivity is vital because it determines how faithfully a system tracks its desired output or responds to commands:
- Ensures Appropriate Reaction: It guarantees that the system responds meaningfully to significant changes or commands, rather than being sluggish or unresponsive.
- Impacts Precision and Control Fidelity: Correct sensitivity is crucial for fine-tuned control, allowing for accurate adjustments and smooth operation.
- Balance Between Responsiveness and Stability: Like deadband, sensitivity requires a careful balance. A system needs to be responsive enough to perform its task but not so sensitive that it becomes unstable.
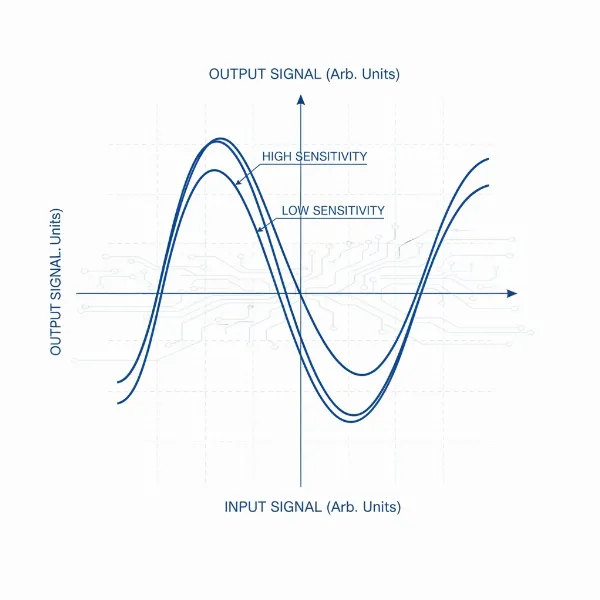 A graph illustrating control system sensitivity with two curves: one showing high sensitivity (steep response) and another low sensitivity (gradual response) to input changes.
Adjusting Sensitivity Settings: Optimizing System Response
Adjusting sensitivity profoundly affects how a system behaves:
- High Sensitivity: This makes a system highly responsive, reacting quickly and strongly to even small input changes. While desirable for rapid response, excessive sensitivity can lead to instability, overcorrection, oscillations (where the system repeatedly overshoots and undershoots the target), and potentially system failure.
- Low Sensitivity: A system with low sensitivity will be more stable and provide a smoother, more gradual response. However, it will be slower to react to changes, potentially leading to larger deviations from the set point or sluggish performance.
In applications like gaming controllers or flight simulators, sensitivity settings often introduce non-linear responses. This means small movements near the center of a joystick might have low sensitivity for fine adjustments, while larger movements towards the edges can trigger high sensitivity for quick, dramatic actions. This allows users to customize the feel and control fidelity to their preference and hardware. For PID controllers, tuning the proportional (P), integral (I), and derivative (D) gains directly impacts the controller’s sensitivity to error, its ability to eliminate steady-state error, and its reaction to the rate of change of the error.
The Interplay: Deadband, Sensitivity, and Optimal Performance
Deadband and sensitivity are not isolated concepts; they are intrinsically linked in shaping a system’s performance. In essence, deadband can be viewed as an intentional reduction of sensitivity to minor fluctuations around a set point. By introducing a deadband, you are essentially telling the system to be insensitive within a specific range, thereby managing the consequences of high sensitivity to noise.
Achieving optimal performance involves finding a harmonious balance between these two parameters. A system might be designed with high overall sensitivity to critical inputs for rapid response, but then employ deadband to filter out the “noise” or minor variations that would otherwise cause undesirable chattering or false alarms.
Considerations for Optimal Settings:
- Application Requirements: What is the primary goal? Is it absolute precision (requiring tighter control and potentially narrower deadband/higher sensitivity) or energy efficiency and component longevity (favoring wider deadband/lower sensitivity to minor fluctuations)? Safety-critical systems often demand extremely narrow deadbands and high sensitivity to fault conditions.
- System Dynamics and Noise: Understand the inherent variability and noise in your system. A noisy environment might benefit from a wider deadband, while a very stable process could tolerate a narrower one.
- Consequences of Misconfiguration: Consider the risks of both over-sensitivity (instability, wear, energy waste) and over-insensitivity (poor control, delayed response, larger deviations from target).
- User Preference: For systems with human interaction, user comfort and intuitive control often play a role in setting sensitivity.
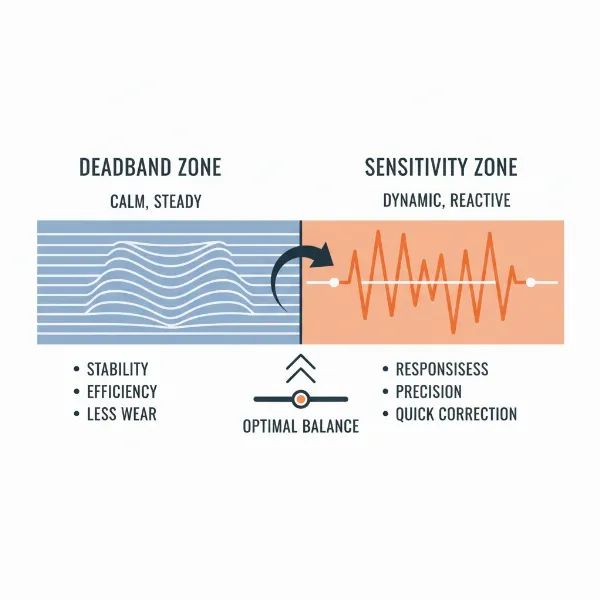 An infographic illustrating the balance between deadband and sensitivity for optimal system performance, showing a stable zone versus a responsive zone.
Best Practices for Setting Deadband and Sensitivity
When configuring these critical parameters, a methodical approach yields the best results:
- Consult Manufacturer Recommendations: Always start with the guidelines provided by the equipment manufacturer. These are often based on extensive testing and designed for the typical operating range of the device.
- Observe and Test System Behavior: Implement small adjustments one at a time. Observe how the system reacts over a period, noting changes in stability, cycling frequency, energy consumption, and how closely it maintains the set point.
- Consider the Trade-offs: Be mindful of the compromises you are making. A wider deadband saves wear and energy but might result in slightly larger temperature swings. Higher sensitivity offers quicker response but can lead to instability.
- Document Your Changes: Keep a record of the settings you apply, the reasons for the changes, and the observed effects. This is invaluable for troubleshooting or future adjustments.
Regular review of these settings, especially after system modifications or changes in environmental conditions, ensures that your control system continues to operate at its peak.
 A checklist or flowchart for optimizing deadband and sensitivity settings in a control system.
In the intricate world of control systems, deadband and sensitivity are unsung heroes. They are the silent architects of stability, efficiency, and responsiveness, empowering systems to operate reliably day in and day out.
Conclusion
Understanding and judiciously applying deadband and sensitivity settings are fundamental to optimizing any control system. Deadband prevents wasteful cycling and enhances longevity by creating a zone of intentional inaction, while sensitivity dictates the precision and speed with which a system responds to changes. Mastering the interplay between these two parameters allows engineers and technicians to fine-tune systems for optimal efficiency, stability, and responsiveness, tailored to the specific demands of each application.
Are your systems running as smoothly and efficiently as they could be, or might a thoughtful adjustment to deadband and sensitivity unlock new levels of performance?
Frequently Asked Questions
What is the primary difference between deadband and hysteresis?
Deadband and hysteresis are often used interchangeably, particularly in simple switch contexts, as both describe a lag between an input and output response. However, deadband specifically refers to a deliberate range of input values where no output change occurs, typically around a set point to prevent rapid cycling. Hysteresis is a more general phenomenon where a system’s output depends on its previous state, often a result of inherent physical properties rather than a configurable setting.
Can a system have both high deadband and high sensitivity?
Yes, conceptually a system can. A high deadband implies a large “do nothing” zone around a set point. High sensitivity implies that once the system leaves the deadband, it reacts very strongly and quickly to the error. This combination could mean the system is very stable within the deadband but aggressive in its correction once outside it.
How do I know if my deadband and sensitivity settings are optimal?
Optimal settings depend on your system’s specific goals. You’ll know they’re optimal when the system operates reliably without excessive cycling (good deadband), maintains desired output with acceptable deviations (good balance between deadband and sensitivity), and responds appropriately to commands without instability or sluggishness (good sensitivity). Monitor energy consumption, equipment wear, and control performance over time.