Ever watched professional-looking videos with perfectly smooth camera movement, wondering how they achieve such fluidity, even when the person filming is on the move? The secret often lies not just in advanced equipment, but in a refined technique known as “The Ninja Walk.” This specialized walking method dramatically reduces camera shake and vertical bounce, transforming choppy footage into captivating, stable shots. Whether you’re a seasoned videographer with a gimbal or a casual content creator using a smartphone, mastering the Ninja Walk is a game-changer for enhancing your video quality. This article will guide you through the principles and practical steps of this essential technique, along with supplementary tips to achieve buttery-smooth footage every time.
Understanding the “Ninja Walk”: What It Is and Why It Works
The Ninja Walk, often called the Gimbal Walk, is a deliberate, modified way of moving designed to minimize the impact and vertical motion typically generated by human footsteps. Normal walking involves a distinct up-and-down oscillation as weight shifts from one foot to the other, which translates directly into distracting camera bounce in your footage. A 3-axis camera gimbal excels at stabilizing rotational movements (pan, tilt, roll), but it doesn’t inherently eliminate this vertical “bobbing” motion.
This is where the Ninja Walk comes in. By consciously adjusting your body mechanics, you absorb the shocks of walking before they reach your camera. The technique transforms your body into a natural, fluid suspension system, allowing the camera to maintain a consistent height and horizontal plane. The result is noticeably smoother, more professional-looking video, regardless of whether you’re using sophisticated gear or simply shooting handheld.
Mastering the Core Techniques of the Ninja Walk
Achieving the Ninja Walk requires practice and a mindful approach to your movement. Focus on these fundamental techniques to become a master of smooth camera operation while on the move.
The “Soft Foot” Landing
One of the most significant contributors to shaky footage is the jarring impact of your feet hitting the ground. The Ninja Walk emphasizes a gentle, deliberate foot placement.
- Roll Your Foot: Instead of landing abruptly heel-first, aim to roll your foot smoothly from the heel to the ball, or even place it flat-footed, gently onto the ground. Imagine your foot is a wheel, softly gliding rather than stepping. This dampens vibrations and prevents abrupt vertical shifts. Ensure a continuous forward progression, avoiding any pauses as your heel touches down, as even slight stops can appear as jolts in your footage.
Engage Your Knees as Shock Absorbers
Your knees are your natural shock absorbers. Utilizing them correctly is crucial for isolating the camera from your body’s vertical movement.
- Stay Flexed: Keep your knees consistently bent throughout your stride, maintaining a slightly lower center of gravity than a normal walk. Think of your legs as coiled springs, constantly absorbing impact. This prevents your hips and torso from rising and falling sharply with each step, significantly reducing vertical bounce.
- Lower Your Center of Gravity: By bending your knees and adopting a slightly crouched stance, you create a more stable base. This lowers your body’s center of gravity, making you less susceptible to vertical shifts and enhancing overall stability.
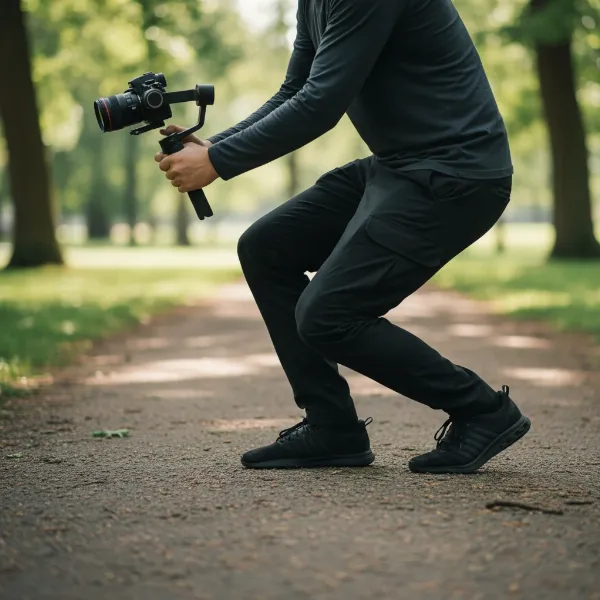 A person demonstrating the Ninja Walk with bent knees, absorbing vertical movement, maintaining camera stability.
Smooth, Fluid Motion
The goal is to achieve a gliding motion, free from sudden accelerations or decelerations.
- Imagine Gliding: Visualize yourself floating across the ground. Your movement should be continuous and fluid, not a series of distinct, jarring steps. Avoid any sudden stops or starts, as these will invariably translate into noticeable camera movements. Maintain a steady pace and smooth transitions.
Shorten Your Stride
Long strides can exaggerate vertical movement and make it harder to maintain a consistent camera height.
- Take Controlled Steps: Opt for shorter, more controlled steps. This minimizes the distance your body travels up and down with each footfall, making it easier for your bent knees to absorb any residual motion. Shorter steps also provide more points of contact with the ground over time, contributing to overall stability.
Core Control and Posture
Your core is the anchor of your body’s stability. Engaging it properly can prevent unwanted sway and rotation.
- Engage Your Core: Maintain a strong, engaged core. This doesn’t mean stiffening your body, but rather using your abdominal muscles to stabilize your torso. Many sources suggest that true “gimbal walking” involves controlling movement from your core, avoiding the natural “cross-crawl” motion (where opposite arm and leg swing forward together) which can cause you to rise after heel contact. A relatively narrow stance also helps prevent side-to-side shifting.
Hand and Arm Placement
How you hold your camera or gimbal directly impacts stability.
- Two Hands for Stability: Always use both hands on your camera rig or gimbal. This provides greater control and distributes the weight, significantly reducing fatigue and the resulting shakiness.
- Elbows Tucked In: Keep your elbows close to your body, ideally tucked into your chest. This creates additional points of contact and forms a more stable, compact unit with your camera, minimizing extraneous arm movements that can cause vertical or horizontal wobbles. Keeping the gimbal as close to your chest as possible can further minimize vertical motion.
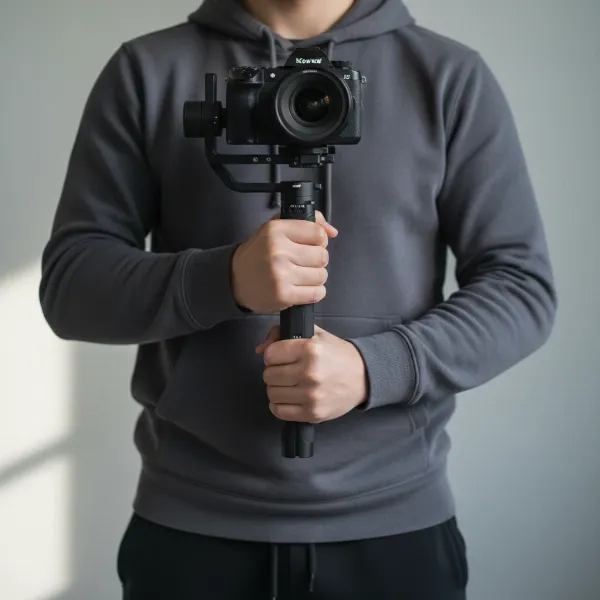 A person holding a camera and gimbal with both hands, elbows tucked in, close to the body for maximum stability.
Enhancing Your Ninja Walk with Gear and Settings
While the Ninja Walk is primarily a body technique, certain equipment and camera settings can significantly complement your efforts, taking your smooth footage to the next level.
Gimbal Integration
A 3-axis gimbal is an invaluable tool for smoothing out rotational movements, but it works best in tandem with the Ninja Walk. The gimbal handles pan, tilt, and roll, leaving your body to tackle the vertical bounce. Some operators find that tilting the gimbal slightly forward can help reduce vertical motion, especially when running. Using an extension or monopod with your gimbal can also provide a longer handle, allowing for wider hand separation and enhanced stability.
Lens Choice for Perceived Stability
The focal length of your lens can affect how stable your footage appears.
- Go Wider: Wider lenses (e.g., 16mm, 24mm) inherently make movement less noticeable. A wide field of view effectively “shrinks” any subtle shakes, making your footage seem smoother even with minor imperfections in your walk. This can be a great strategy for vlogging or general walk-throughs.
Adding Weight
Increased mass generally leads to greater inertia, which resists sudden movements.
- Counterweights and Heavier Lenses: Adding counterweights to your gimbal or using a heavier lens can help stabilize your setup. The extra weight makes the camera rig less susceptible to minor jitters and vibrations from your steps. If you extend your gimbal, adding weight to the base of the extension can be particularly effective.
Camera Settings
Leverage your camera’s internal capabilities to further stabilize your shots.
- In-Camera Stabilization (IBIS): Many modern cameras feature in-body image stabilization (IBIS). Enable this feature to work in conjunction with your Ninja Walk for an added layer of smoothness.
- Shutter Speed: While not directly for stability, a faster shutter speed can reduce motion blur, making any residual shake less distracting. Conversely, shooting at a very high frame rate (e.g., 60fps or 120fps) and then slowing it down in post-production can make footage appear incredibly smooth.
Advanced Tips and Practice Drills
Mastering the Ninja Walk takes time and dedication. Incorporate these advanced tips and practice drills into your routine to refine your technique.
Walking Backwards
This might sound counter-intuitive, but for certain shots, walking backward can yield exceptionally smooth results. When moving backward, your body tends to distribute weight more evenly and gently, naturally reducing the heel-to-toe impact that causes vertical bounce. This technique is particularly useful for following a subject or capturing architectural details where the subject itself isn’t moving fast. You can always reverse the clip in post-production if needed.
Breathing Techniques
Believe it or not, your breathing can impact camera stability, especially during critical moments.
- Controlled Breathing: Practice taking a full breath, exhaling about half, taking your shot, and then slowly releasing the rest of the air. This method, similar to techniques used in marksmanship, promotes physical relaxation and can minimize subtle body movements that might cause jitter. A long, slow exhale helps achieve maximum physical relaxation, which in turn enhances stability.
Practice Exercises
Consistent practice is the key to making the Ninja Walk feel natural.
- The “Brick Wall” Drill: Find a long brick wall and frame your shot so the horizontal lines of the bricks touch the top and bottom edges of your frame. As you perform the Ninja Walk along the wall, focus on keeping those lines perfectly straight and level. Review your footage to identify any vertical bounce or sway. This visual feedback is incredibly effective for pinpointing and correcting your movements.
- The “Knee Belt” Drill: To consciously practice taking shorter steps and keeping your knees flexed, try tying a belt loosely around your knees. This encourages you to bend your knees and limits your stride length, helping to ingrain the correct muscle memory.
Post-Production Stabilization
While aiming for perfect in-camera footage is ideal, post-production stabilization can be a powerful final touch. Software like Adobe Warp Stabilizer, DaVinci Resolve’s stabilization, GyroFlow, or even simple online video stabilizers can further smooth out minor wobbles. However, be mindful that excessive post-stabilization can sometimes introduce artifacts or a “jello” effect, and often crops your footage, so it’s always better to get the shot as stable as possible during filming.
The Ninja Walk vs. Steadicam
It’s important to distinguish the Ninja Walk from using a Steadicam. A Steadicam is a mechanical camera stabilization system with a spring-loaded arm and vest, designed to isolate the camera from the operator’s body movements. The very essence of a Steadicam is to allow the operator to walk relatively naturally while the arm absorbs the bounce. While Steadicam operators still refine their walk to be smooth and avoid excessive hip sway, the underlying principle is that the equipment does the heavy lifting for stabilization. The Ninja Walk, by contrast, is a fundamental body technique that can be applied with or without a gimbal, and is crucial for counteracting the vertical motion that gimbals don’t inherently stabilize.
“Many beginners are surprised when their gimbal footage still has vertical bounce. They don’t realize the gimbal only handles rotational axes. The Ninja Walk is your body’s built-in Z-axis stabilizer.”
Conclusion
The pursuit of cinematic, stable footage is a journey, and the Ninja Walk is an indispensable skill in any videographer’s toolkit. By understanding and diligently practicing the core body mechanics—softening your foot landings, keeping your knees bent, engaging your core, and maintaining a fluid motion—you can dramatically reduce unwanted camera shake. Combine these techniques with thoughtful gear choices and camera settings, and leverage post-production stabilization as a final polish.
Remember, consistency and practice are paramount. Each time you pick up your camera, be mindful of your steps, and with dedication, you’ll soon be gliding through your shots, capturing incredibly smooth footage that captivates your audience. So, how will you incorporate the Ninja Walk into your next filming adventure?
Frequently Asked Questions
What causes shaky video when walking, even with a gimbal?
Even with a 3-axis gimbal, video can appear shaky due to the vertical “bounce” of your body as you walk. Gimbals primarily stabilize rotational movements (pan, tilt, roll), but they don’t inherently eliminate the up-and-down motion your steps create. The Ninja Walk addresses this by changing your body’s mechanics to absorb these vertical shocks.
Can I do the Ninja Walk without a gimbal?
Absolutely! The Ninja Walk is a body technique that significantly improves stability even when shooting handheld with a smartphone or a camera without a gimbal. It trains your body to act as a natural stabilizer, reducing bounce and vibrations regardless of your equipment setup.
How long does it take to master the Ninja Walk?
Mastering the Ninja Walk takes consistent practice. While you might see initial improvements quickly, achieving a truly fluid, natural-looking “ninja walk” can take many hours of dedicated practice. Incorporating drills like walking along a brick wall or focusing on individual body mechanics will accelerate your progress.
Does the Ninja Walk slow you down?
Initially, practicing the Ninja Walk might cause you to walk slower and feel unnatural. However, as you become more proficient, the technique can be adapted to various speeds, including faster walking or a light jog, while maintaining smooth footage. It’s about efficiency of motion, not necessarily speed.
What’s the biggest mistake beginners make when trying to walk smoothly with a camera?
The most common mistake is relying solely on the gimbal or camera stabilization and neglecting fundamental body mechanics. Beginners often walk with stiff legs, hard heel strikes, and neglect core engagement, leading to persistent vertical bounce despite having stabilizing equipment.