In the world of filmmaking and content creation, achieving cinematic, smooth footage often hinges on a well-balanced gimbal. But a gimbal alone is just the beginning. To truly elevate your production quality, integrating external monitors, microphones, and lights becomes essential. Many creators struggle with how to effectively mount and manage these crucial accessories without compromising their gimbal’s performance or balance. This comprehensive guide will walk you through the process, ensuring your gimbal setup is not only stable but also optimized for superior visual and audio capture.
Understanding Gimbal Rigging Fundamentals
Transforming your basic gimbal setup into a versatile production rig starts with understanding a few core principles. The goal is to enhance your shooting capabilities without hindering the gimbal’s primary function: stabilization.
Why Accessorize Your Gimbal?
Adding accessories like external monitors, microphones, and lights offers significant advantages. A monitor provides a larger, clearer view of your shot, aiding in critical focus and framing. External microphones capture professional-grade audio, a vital component often overlooked. Lights, even small ones, can fill in shadows, add catchlights, or illuminate subjects in low-light conditions, drastically improving your visual output. These additions empower creators to achieve a higher standard of production directly on set.
 professional gimbal setup with camera, external monitor, microphone, and LED light attached
Payload Capacity and Balance: The Golden Rules
Every gimbal has a maximum payload capacity—the total weight it can effectively stabilize. Overloading your gimbal can lead to motor strain, poor stabilization, and even damage. Equally important is balancing your gimbal after all accessories are attached. Unlike traditional camera setups, gimbal accessories are ideally mounted to the handle or dedicated rigging solutions, not directly to the camera’s balanced platform. This prevents an uneven distribution of weight that could throw off your gimbal’s delicate balance and impede its range of motion. Lightweight accessories and careful placement are key to maintaining optimal performance.
Essential Mounting Solutions
To attach your accessories securely and efficiently, you’ll need a variety of mounting hardware. These typically include:
- Cold Shoe Mounts: These standard mounts are common on many camera accessories and can be added to your gimbal handle or rig via adapters.
- 1/4″-20 Threads: A universal screw size found on most camera gear and many gimbal handles, allowing for direct attachment of various accessories.
- Magic Arms: Flexible, articulated arms that allow precise positioning of monitors and lights. They typically attach to a 1/4″-20 thread and feature a ball head at each end for versatile angles.
- L-Brackets and Cheese Rings/Plates: These extenders attach to your gimbal’s handle, providing multiple mounting points (cold shoes and 1/4″-20 threads) without interfering with the camera cage or balancing mechanisms. They are crucial for distributing the weight of multiple accessories evenly.
- Extension Arms: Carbon fiber or aluminum extensions that can mount to the bottom of your gimbal, offering additional 1/4″-20 threads for side handles or other accessories, improving ergonomics and providing extra mounting points.
Integrating External Monitors for Enhanced Monitoring
An external monitor is arguably the most impactful accessory for improving your gimbal workflow, offering a clearer, larger view than your camera’s built-in screen.
Choosing the Right Monitor
Consider monitors that are lightweight and compact, ideally around 5-7 inches. Look for features like high brightness for outdoor shooting, focus peaking, false color, and custom LUT support to aid in exposure and color grading. Battery efficiency is also a major factor for prolonged shoots.
Mounting Your Monitor Securely
The most common and effective way to mount a monitor is using a magic arm attached to an L-bracket, cheese ring, or directly to a 1/4″-20 thread on your gimbal’s handle. Position the monitor so it’s easily visible without obstructing your view of the camera or gimbal controls. Ensure it’s tightly secured to prevent any wobbling during movement.
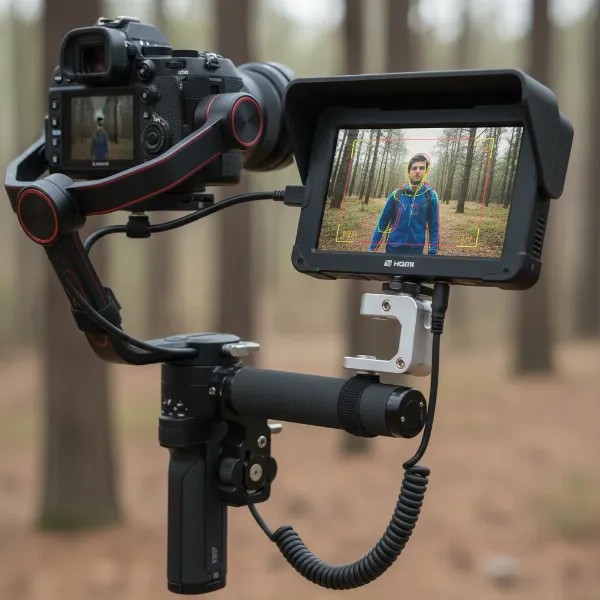 close-up of an external monitor securely mounted on a camera gimbal via a magic arm
Powering the Monitor
External monitors typically require their own power source. Using slim, lightweight NP-F style batteries is a popular choice as they add minimal weight and last for hours. Some advanced gimbals, like the DJI RS 4, offer power output ports that can directly power certain monitors, simplifying your setup and reducing the need for extra batteries. Always use a short, coiled cable to connect your monitor to its power source if not drawing power directly from the gimbal, minimizing cable clutter and snagging.
Connecting to Your Camera
An HDMI cable connects your camera to the monitor. Opt for short, coiled HDMI cables to prevent tangles and keep your rig tidy. Wireless video transmitters can also be used, but these add additional weight and power requirements. For optimal image quality and minimal latency, a direct HDMI connection is often preferred for on-gimbal monitoring.
Adding Microphones for Superior Audio Quality
Good audio is paramount to professional video. While in-camera microphones can suffice for basic scratch audio, dedicated external microphones provide significantly better sound.
Types of Microphones for Gimbal Use
- Shotgun Microphones: These directional mics are excellent for capturing focused audio from your subject while minimizing ambient noise. They are compact and relatively lightweight, making them suitable for gimbal use.
- Wireless Lavalier Systems: Ideal for interviews or when your subject is further from the camera, lavalier mics clip onto clothing and transmit audio wirelessly to a receiver mounted on your gimbal. This offers freedom of movement and consistent audio quality regardless of camera distance.
Mounting Microphones Effectively
Shotgun microphones typically attach via a cold shoe mount. You can use a cold shoe adapter on a magic arm, L-bracket, or side handle to position the mic correctly. Ensure the microphone is pointed towards your subject and is positioned to avoid picking up motor noise from the gimbal itself. For wireless lavalier receivers, a simple cold shoe mount is usually sufficient.
Cable Management for Audio
Just like with monitors, careful cable management is crucial for microphones. Use short cables and secure them with cable ties or velcro straps to the gimbal handle, preventing them from interfering with the gimbal’s movement or getting caught on objects.
Illuminating Your Shots with On-Gimbal Lights
Sometimes, a little extra light can make a huge difference in your footage, especially in challenging lighting conditions.
Selecting Appropriate LED Lights
Choose compact, lightweight LED panels or small light sticks that offer adjustable brightness and color temperature. Battery-powered options are generally preferred for portability. The goal is to add controlled illumination without significantly increasing the gimbal’s payload.
Mounting Lights for Optimal Illumination
LED lights commonly use a cold shoe mount. Attach them to a magic arm or directly to a cold shoe on your gimbal’s handle or L-bracket. Experiment with positioning to find the most flattering light for your subject. A common placement is slightly above and to the side of the camera.
Powering Your Light Setup
Most small LED lights are powered by built-in rechargeable batteries or NP-F style batteries. Ensure you have spare batteries or that your light can be powered via USB-C if your gimbal or power bank has an available port. Always consider the duration of your shoot when planning battery needs.
Optimizing Your Gimbal Rig for Performance
A well-rigged gimbal is more than just a collection of accessories; it’s a cohesive system designed for efficient and comfortable operation.
Cable Management Strategies
Loose cables are a gimbal operator’s worst nightmare. They can snag, pull, or even get caught in the gimbal motors, causing errors or damage. Use short, coiled cables whenever possible. Secure all cables to the gimbal’s handle or support structure using velcro ties, cable clamps, or adhesive cable clips. Route them strategically to allow for full range of motion without tension.
Battery Solutions for Extended Shoots
Running out of power mid-shoot is a major setback. Plan your battery strategy carefully.
- Camera Batteries: Carry multiple fully charged camera batteries.
- Gimbal Batteries: Ensure your gimbal battery is fully charged and consider spares for longer productions.
- Accessory Batteries: Have enough dedicated batteries for your monitor and light, or explore solutions where accessories can draw power from the gimbal itself if available. Power distribution hubs can also centralize power for multiple accessories, though they add complexity.
Re-balancing Your Gimbal After Adding Accessories
Adding or removing any accessory will affect your gimbal’s balance. Always re-balance your gimbal after making changes to your rig. This involves adjusting the camera and accessory positions on all three axes (tilt, roll, pan) until the camera remains level when moved manually. Most gimbals have a calibration function in their accompanying app that can fine-tune performance after manual balancing.
Ergonomics and Comfort for Long Takes
Holding a rigged gimbal for extended periods can be physically demanding. Consider ergonomic accessories:
- Dual Handgrips: These distribute the weight across both arms, reducing fatigue and providing more stable control.
- Slings/Support Systems: Vest-style supports or monopods can take the load off your arms for very long shoots.
- Adjustable Handles: Ensure all handles and grips are positioned comfortably for your shooting style.
“A perfectly balanced gimbal with intelligently placed accessories can feel like an extension of your creative vision, allowing you to focus on the shot, not the struggle.” – Jane Doe, Professional Cinematographer and Gimbal Specialist
Conclusion
Rigging your gimbal with monitors, mics, and lights is a transformative step towards professional-grade video production. By understanding the fundamentals of payload capacity and balance, selecting appropriate mounting solutions, and carefully integrating each accessory, you can unlock a new level of creative control and efficiency. From enhanced monitoring and crystal-clear audio to effective illumination, a well-configured gimbal rig empowers you to capture stunning footage with confidence. Don’t let the complexity intimidate you; with a methodical approach, you’ll master your gimbal setup and elevate your storytelling. What creative stories will your newly rigged gimbal help you tell?
Frequently Asked Questions
Can I attach heavy lenses and multiple accessories to any gimbal?
No, every gimbal has a maximum payload capacity. It’s crucial to check your gimbal’s specifications and choose lightweight accessories to avoid exceeding this limit, which can strain motors and compromise stabilization.
How do I prevent cables from interfering with my gimbal’s movement?
Use short, coiled cables for all connections. Secure them tightly to the gimbal’s handle or support structure using cable ties or velcro straps, ensuring they have enough slack to allow for full range of motion without tension.
Is an external monitor always necessary for gimbal use?
While not strictly “necessary,” an external monitor greatly enhances visibility, allowing for more precise focus, framing, and exposure adjustments, especially when shooting at awkward angles or in bright sunlight.
Where should I mount my microphone to avoid gimbal motor noise?
Mount your microphone on an extension arm or L-bracket away from the gimbal motors and camera body. Using a shock mount with your microphone can also help isolate it from vibrations and handling noise.
How often should I re-balance my gimbal when adding accessories?
You should re-balance your gimbal every time you add, remove, or significantly reposition any accessory, including changing lenses or even adding a larger battery to your camera. Precise balance is key for optimal performance.