You’ve invested in a gimbal, expecting buttery-smooth, cinematic footage, yet your videos still suffer from subtle, high-frequency shakes. These “micro-jitters” can be incredibly frustrating, transforming an otherwise perfect shot into a distracting mess. Understanding the root causes and implementing a comprehensive strategy—before, during, and after your shoot—is crucial to achieving the flawless gimbal footage you desire.
Understanding Micro-Jitters: Pinpointing the Problem
Micro-jitters are those small, rapid, and often almost imperceptible vibrations that compromise the fluidity of your video. They are distinct from larger shakes or wobbles, which are typically easier to identify and rectify. Pinpointing the exact cause of micro-jitters can be challenging, but they commonly stem from a combination of factors related to your equipment setup, environmental conditions, and operating technique.
Common culprits include improper gimbal balancing, where the camera’s weight isn’t perfectly distributed, forcing the motors to constantly overcompensate. Incorrect motor tuning, involving settings like motor strength, stiffness, or deadband, can also lead to erratic responses from the gimbal. A frequent issue arises from conflicts between the camera’s built-in stabilization (IBIS) or lens stabilization (OIS) and the gimbal’s own stabilization system. Even seemingly minor details such as loose cables or accessories can introduce vibrations. External elements like wind or ground vibrations can overwhelm the gimbal’s stabilization capabilities, while suboptimal operating techniques, such as an unsteady walk, can directly transfer subtle movements to the rig. Lastly, using a camera/lens payload that is either too light or too heavy for the gimbal, employing longer focal lengths that exaggerate any movement, or issues with shutter speed can contribute to the dreaded “jello” effect or general judder.
Pre-Shoot Perfection: Setting Up for Success
The foundation of smooth gimbal footage is laid long before you hit the record button. Meticulous preparation is your first and most critical line of defense against micro-jitters.
Meticulous Gimbal Balancing
This is arguably the most crucial step for achieving stable footage and ensuring the longevity of your gimbal motors. A perfectly balanced gimbal means its motors exert minimal effort to hold the camera in any position. When the motors are off, your camera should remain still, without drifting or tilting on the tilt, roll, or pan axes. This involves carefully adjusting your camera plate and arms until the camera is balanced front-to-back, side-to-side, and then vertically on each axis. Remember, any change to your camera setup—a different lens, a new filter, or even an added microphone—requires re-balancing.
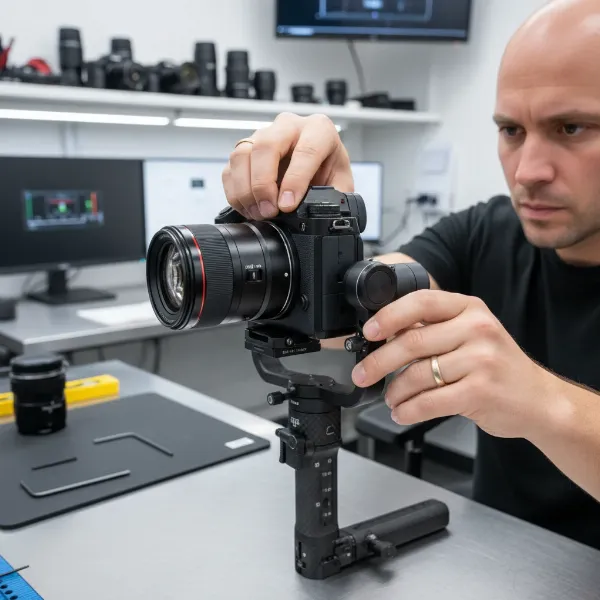 Man's hands meticulously balancing a professional camera on a 3-axis gimbal for smooth video.
Camera & Lens Stabilization: The IBIS/OIS Debate
A common point of contention is whether to keep your camera’s in-body image stabilization (IBIS) or lens optical image stabilization (OIS) enabled when using a gimbal. Generally, it’s recommended to turn off these in-camera stabilization features to prevent them from conflicting with the gimbal’s motors, which can actually introduce jitters. However, modern camera systems, particularly some Sony models, have advanced IBIS that can sometimes work in harmony with a gimbal, especially at longer focal lengths. The best approach is to conduct a quick test with your specific gear, shooting with IBIS/OIS both on and off, to determine which setting yields the smoothest results for your setup.
Firmware & Software Updates
Always ensure that both your gimbal and camera firmware are up to date. Manufacturers frequently release updates that improve stabilization algorithms, enhance motor performance, and fix bugs that could contribute to jitters. Utilize your gimbal’s companion app for calibration and to access advanced settings that can fine-tune its performance.
Secure All Components
Before every shoot, thoroughly check that all camera plates, lens feet, and accessories are securely tightened. Loose components can introduce subtle vibrations that the gimbal struggles to counteract. Pay particular attention to cable management. Stiff HDMI, USB, or microphone cables pressing against the gimbal’s axes can add resistance, forcing the motors to work harder and potentially causing persistent twitching. Opt for soft, flexible cables and ensure they are routed in a way that doesn’t impede gimbal movement.
In-Shoot Mastery: Techniques for Smooth Capture
Even with a perfectly balanced gimbal, your operating technique plays a significant role in preventing micro-jitters. How you move, the settings you choose, and your awareness of the environment all contribute to the final smoothness of your footage.
Optimize Gimbal Motor Parameters
Most gimbals allow you to adjust motor strength, stiffness, and deadband settings via their smartphone app. Fine-tuning these parameters to match your specific payload is crucial. If motors are too weak, they may struggle to stabilize; if too strong, they can overcompensate and vibrate. Experiment with the “deadband” setting, which dictates how much input movement is ignored before the gimbal reacts. A higher deadband can make movements smoother and less prone to jitter by reducing sensitivity to your tiny, involuntary hand movements.
Refine Operating Technique
The way you move while operating a gimbal has a massive impact. The “ninja walk” or “gimbal walk” is a widely recognized technique designed to minimize vertical bounce. This involves bending your knees, taking small, deliberate steps, and keeping your core engaged while your upper body remains as stable as possible. For added stability, especially with heavier camera rigs or compact gimbals that are more susceptible to minor movements, consider using a two-handed grip or a dual-handle setup. Always practice smooth starts and stops, avoiding jerky movements that force the gimbal to make sudden corrections.
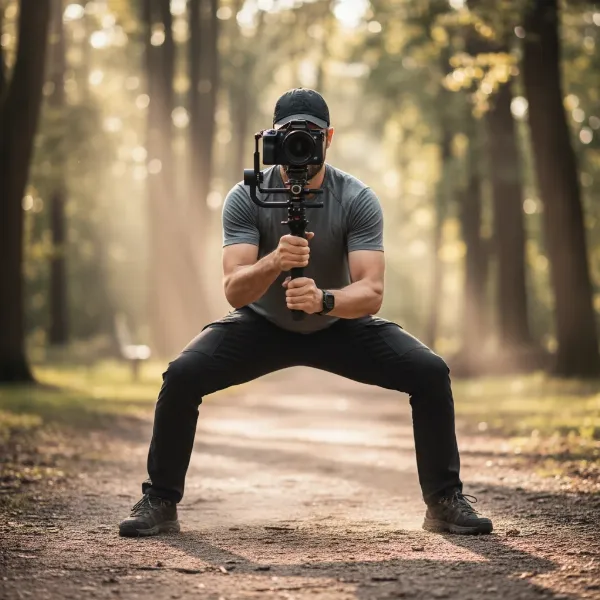 Videographer demonstrating the "ninja walk" technique with a gimbal for smooth, stable footage.
Consider Shutter Speed and Frame Rate
Incorrect shutter speed can introduce a “jello” effect or judder, particularly with CMOS sensors and fast movements. A good rule of thumb is the 180-degree shutter rule (shutter speed is double your frame rate, e.g., 1/50th for 25 frames per second footage). For shots involving extensive panning, consider shooting at a higher frame rate (such as 48 or 60 frames per second for a 24 or 25 frames per second timeline). This allows you to slow down the footage in post-production, effectively smoothing out any subtle judder that might occur during rapid movement.
Mitigate Environmental Factors
Wind is a gimbal’s enemy, causing erratic movements that motors struggle to suppress. When shooting in windy conditions, use a wind shield if possible, or opt for a heavier gimbal setup that offers more resistance. Be mindful of ground vibrations from nearby traffic, machinery, or even heavy footsteps, as these can easily transfer to your footage.
Post-Production Polishing: Salvaging Imperfect Footage
Even with the most meticulous preparation and skillful operation, some footage might still exhibit minor micro-jitters. Post-production software can offer a helping hand, but it’s important to use these tools judiciously.
Software Stabilization
Popular video editing software like Adobe Premiere Pro (with Warp Stabilizer) and DaVinci Resolve include powerful stabilization tools that can minimize jitters. When applying stabilization, start with a low “smoothness” percentage, typically between 1-10%. Over-stabilization can lead to an unnatural, “jello-like” distortion or significant cropping of your image. For Warp Stabilizer, if you notice warping, try changing the “Method” from “Subspace Warp” to “Position, Scale, Rotation” and enabling “Detailed Analysis”.
Rolling Shutter Correction
In scenarios with fast movement and high-frequency vibrations, CMOS sensors can produce a “rolling shutter” effect, where straight lines appear skewed or wobbly. Many editing suites offer tools to correct this distortion, which can further clean up jittery footage.
Gyro Data Stabilization
Some advanced cameras are capable of recording internal gyro metadata alongside your video files. Software like DaVinci Resolve can utilize this data for highly precise stabilization in post-production, often resulting in footage with less rolling shutter distortion and a more natural feel than traditional pixel-based stabilization. Check if your camera supports this feature for an incredibly effective stabilization workflow.
Table: Common Jitter Causes and Solutions
| Cause | Symptom (Jitter Type) | Pre-Shoot Fix | In-Shoot Fix | Post-Production Fix |
|---|---|---|---|---|
| Improper Balancing | Oscillations, Drifting | Meticulous Balancing | Re-balance (if possible) | Software Stabilization (limited) |
| Incorrect Motor Tuning | Vibrations, Bumps | Adjust Motor Strength/Stiffness | Re-tune via app | Software Stabilization |
| IBIS/OIS Conflict | Wobbly, Snapping | Disable Camera/Lens IS (test first) | Test IS modes on/off | Software Stabilization |
| Loose Components/Cables | Random Twitches | Secure all components, flexible cables | Immediate check & tighten | Minor Software Stabilization |
| Operator Error | Uneven Motion | Practice “Ninja Walk” | Slow down, Use Two Hands | Software Stabilization |
| Wind Interference | Random Shakes | Wind Shield, Heavier Setup | Change Location, Lower Shot | Software Stabilization |
| Long Focal Lengths | Exaggerated Movement | Use Wider Lenses, More Stable Gimbal | Be Extra Careful, Use Support | Software Stabilization (crop) |
| Panning Judder | Stuttering Motion | N/A | Shoot at Higher Frame Rate | Slow down clip (if high FR) |
Expert Tips for Flawless Gimbal Footage
Achieving consistently smooth footage is an art form that blends technical know-how with practical experience. Remember these insights from seasoned professionals:
“A gimbal is only as smooth as its balance.” This fundamental principle underscores that no amount of motor power or post-production magic can compensate for poor balancing.
- Constant Monitoring: Utilize an external monitor with your camera setup. This allows you to spot micro-jitters in real-time and make immediate adjustments, saving you valuable time and effort in post-production.
- Test, Test, Test: Every camera, lens, and gimbal combination is unique. What works perfectly for one setup might introduce jitters in another. Dedicate time to test your gear in various scenarios to understand its nuances and optimize settings.
- Manage Expectations: While gimbals are incredible tools, even professional-grade units aren’t a substitute for a full Steadicam rig. Some degree of post-stabilization might still be necessary for achieving truly “perfect” shots.
Troubleshooting: Quick Fixes for Persistent Jitters
If you’re still battling persistent micro-jitters, don’t despair. Run through this quick checklist to isolate and resolve the issue:
- Re-balance the gimbal meticulously: This is always the first step, ensuring perfect static and dynamic balance.
- Restart the gimbal and camera: A simple power cycle can often resolve temporary software glitches.
- Check all physical connections and cables: Ensure everything is tight and no cables are snagging on the gimbal’s moving parts.
- Update firmware: Verify that both your gimbal and camera have the latest firmware versions installed.
- Re-tune motor parameters: If auto-tuning doesn’t work perfectly, manually adjust motor strength, stiffness, and deadband incrementally until jitters subside.
Conclusion
Micro-jitters can be a significant hurdle for any videographer aiming for professional-grade, smooth footage. However, by embracing a comprehensive strategy that involves diligent pre-shoot preparation, refined in-shoot techniques, and judicious post-production adjustments, you can effectively conquer this common challenge. Remember that perfect gimbal footage is a synergy of precision balancing, intelligent motor tuning, skillful operation, and a keen eye for detail. Implement these strategies, and watch your video production elevate to a new level of smoothness and professionalism.
What hidden gimbal trick has saved your footage from the dreaded jitters?
FAQ
What are the primary causes of micro-jitters in gimbal footage?
|
Our Picks for the Best Washing Machine in 2026
As an Amazon Associate I earn from qualifying purchases.
|
||
| Num | Product | Action |
|---|---|---|
| 1 | Portable Washing Machine - Compact 2.0 Cu.ft Portable Washer, Full-Automatic Top Loader for Space Saving, Ideal for Apartments, Homes, and Dorms, 10 Wash Cycles, Low Noise, IPX4 with Drain Pump |

|
| 2 | Avanti Portable Compact Washing Machine for Clothes/Laundry, 0.84 Cu. Ft. Capacity, Standard Sink/Faucet Attachment for Apartment, Dorm, RV, White |
|
| 3 | Giantex Portable Washing Machine, 17.6lbs Compact Washer Spinner Combo with Pump Drain, Twin Tub 11lbs Wash & 6.6lbs Spin, Lavadoras Portatiles for Apartment RV Dorm College (White & Blue) |
|
| 4 | Portable Washing Machine,16L Upgraded Large Capacity Portable Washer With 3 Modes Deep Cleaning.Suitable For Travel, Camping,Apartments, Dormitories, Hotels (Green) |
|
| 5 | Waterjoy Portable Washing Machines, 7.7 lbs Load Capacity Portable Washer and Dryer Combo with Built-in Barrel Light & LED Display for Household and Apartment (Blue) |
|
| 6 | COSTWAY Portable Washing Machine, Twin Tub 26 Lbs Capacity, 18 Lbs Washer and 8 Lbs Spinner, Compact Washer with Control Knobs, Timer Function, Drain Pump, Laundry washer for Apartment RV, Blue |
|
| 7 | COSTWAY Portable Washing Machine, Twin Tub 26lbs Capacity Laundry, 18lbs Washer and 8lbs Spinner Combo with Timer Knobs, Built-in Drain Pump, Compact Washer for Home Dorm Apartment (Grey+White) |
|
| 8 | Giantex Portable Washing Machine, 21lbs Capacity, 14.4lbs Washer and 6.6Llbs Spinner, Compact for Apartment RV, White & Gray, GT-GE-10390US-GR-FP |
|
| 9 | COSTWAY Portable Washing Machine, Twin Tub 26lbs Capacity Laundry Washer, 18lbs Washer and 8lbs Spinner Combo with Timer Knobs, Built-in Drain Pump, Compact Washer for Home Dorm Apartment, Blue+White |
|
| 10 | Giantex Portable Washing Machine, 20lbs Capacity, Twin Tub 2lbs Washer & 8lbs Spinner Combo, Compact for Apartment RV Dorms, Blue & White, GT24267-PE |
|
Micro-jitters often stem from improper gimbal balancing, incorrect motor tuning, conflicts between the gimbal and in-camera/lens stabilization (IBIS/OIS), loose components, and environmental factors like wind. Operator technique and unsuitable camera payloads can also contribute to these subtle, distracting movements.
Can post-production software completely fix micro-jitters?
While software like Warp Stabilizer or DaVinci Resolve’s stabilization can significantly reduce micro-jitters, they are not a magic bullet. Over-stabilization can lead to unwanted “jello” effects or significant cropping. It’s always best to minimize jitters during shooting for the highest quality results.
How often should I balance my gimbal?
You should re-balance your gimbal every time you change your camera setup, including switching lenses, adding filters, microphones, or any other accessories. Even minor changes in weight distribution necessitate re-balancing to ensure optimal performance and prevent motor strain.
Is it better to use lens stabilization (OIS) or gimbal stabilization?
In most cases, it is recommended to turn off in-camera or lens stabilization (IBIS/OIS) when using a gimbal, as they can conflict and cause jitters. However, some newer camera systems and specific scenarios might benefit from leaving them on, so testing with your particular gear is always advisable.
What’s the ideal walking technique for smooth gimbal shots?
The “ninja walk” or “gimbal walk” is ideal. This technique involves bending your knees, taking small, deliberate steps, and keeping your core engaged while your upper body remains as stable as possible. This minimizes vertical translation, which gimbals cannot inherently stabilize.