Ever wondered why some videos look effortlessly cinematic while others suffer from jarring shakes and unlevel horizons? The secret often lies in a well-maintained and properly calibrated gimbal. A gimbal is a sophisticated device designed to stabilize your camera, but even the best technology needs a little fine-tuning to perform optimally. This comprehensive guide will demystify gimbal calibration, explaining its importance, when to perform it, and providing step-by-step instructions to ensure your footage is always buttery smooth and professional.
What is Gimbal Calibration and Why Does it Matter?
|
Our Picks for the Best Washing Machine in 2026
As an Amazon Associate I earn from qualifying purchases.
|
||
| Num | Product | Action |
|---|---|---|
| 1 | Portable Washing Machine - Compact 2.0 Cu.ft Portable Washer, Full-Automatic Top Loader for Space Saving, Ideal for Apartments, Homes, and Dorms, 10 Wash Cycles, Low Noise, IPX4 with Drain Pump |

|
| 2 | Giantex Portable Washing Machine, 17.6lbs Compact Washer Spinner Combo with Pump Drain, Twin Tub 11lbs Wash & 6.6lbs Spin, Lavadoras Portatiles for Apartment RV Dorm College (White & Blue) |
|
| 3 | Giantex Portable Washing Machine, 20lbs Capacity, Twin Tub 2lbs Washer & 8lbs Spinner Combo, Compact for Apartment RV Dorms, Blue & White, GT24267-PE |
|
| 4 | Waterjoy Portable Washing Machines, 7.7 lbs Load Capacity Portable Washer and Dryer Combo with Built-in Barrel Light & LED Display for Household and Apartment (Blue) |
|
| 5 | Avanti Portable Compact Washing Machine for Clothes/Laundry, 0.84 Cu. Ft. Capacity, Standard Sink/Faucet Attachment for Apartment, Dorm, RV, White |
|
| 6 | COSTWAY Portable Washing Machine, Twin Tub 26lbs Capacity Laundry, 18lbs Washer and 8lbs Spinner Combo with Timer Knobs, Built-in Drain Pump, Compact Washer for Home Dorm Apartment (Grey+White) |
|
| 7 | COSTWAY Portable Washing Machine, Twin Tub 26 Lbs Capacity, 18 Lbs Washer and 8 Lbs Spinner, Compact Washer with Control Knobs, Timer Function, Drain Pump, Laundry washer for Apartment RV, Blue |
|
| 8 | Portable Washing Machine,16L Upgraded Large Capacity Portable Washer With 3 Modes Deep Cleaning.Suitable For Travel, Camping,Apartments, Dormitories, Hotels (Green) |
|
| 9 | Giantex Portable Washing Machine, 21lbs Capacity, 14.4lbs Washer and 6.6Llbs Spinner, Compact for Apartment RV, White & Gray, GT-GE-10390US-GR-FP |
|
| 10 | COSTWAY Portable Washing Machine, Twin Tub 26lbs Capacity Laundry Washer, 18lbs Washer and 8lbs Spinner Combo with Timer Knobs, Built-in Drain Pump, Compact Washer for Home Dorm Apartment, Blue+White |
|
Gimbal calibration is an essential process that optimizes the performance of your gimbal’s motors and internal sensors, primarily the Inertial Measurement Unit (IMU). Over time, or due to various external factors, these sensors can lose their precise alignment, leading to noticeable imperfections in your footage. Calibration essentially teaches your gimbal its true horizontal and vertical axes, allowing it to accurately compensate for movement and maintain a perfectly level and stable camera position. This results in incredibly smooth, professional-looking videos and photos, free from unwanted tilts, drifts, or shakes. Without proper calibration, even the most expensive gimbal will struggle to deliver its promised stabilization, compromising the quality of your content.
When Should You Calibrate Your Gimbal?
Knowing when to calibrate your gimbal is as important as knowing how. Proactive calibration can prevent issues, but certain signs and situations definitely call for immediate attention:
- Visible Instability: If you notice your footage has a consistent tilt, the horizon appears unlevel, or the gimbal frequently shakes or drifts, it’s a clear indicator that calibration is needed.
- After a Hard Knock or Fall: Even minor impacts can affect the internal sensors. If your gimbal takes a bump, a recalibration is highly recommended.
- Firmware Updates: Manufacturers often advise calibration after a major firmware update, as new software might slightly alter sensor interpretation.
- Significant Temperature Changes: Extreme shifts in environmental temperature can subtly affect electronic components and require recalibration.
- Long Periods of Storage: Gimbals left unused for extended durations might benefit from a fresh calibration before their next use to ensure optimal readiness.
Before You Calibrate: The Crucial Step of Balancing
Before initiating any calibration process, proper gimbal balancing is absolutely critical. Calibration corrects sensor alignment, but balancing addresses the physical weight distribution of your camera setup. A poorly balanced gimbal forces its motors to work harder, draining battery life, causing overheating, and leading to less effective stabilization, even after calibration. Balancing involves adjusting your camera’s position on the gimbal along the tilt, roll, and pan axes until it remains level without motor assistance. This pre-calibration step ensures your gimbal operates efficiently and that the calibration process yields the most accurate results.
Types of Gimbal Calibration: Automatic vs. Manual
Gimbals typically offer two primary calibration methods, each serving a distinct purpose:
Automatic Calibration
This is the most common and user-friendly method, present in nearly all modern gimbals. Automatic calibration relies on the gimbal’s internal software to detect and correct sensor discrepancies. The process usually involves placing the gimbal on a flat, stable surface and initiating the calibration via a connected app or the device’s onboard menu. The gimbal then performs a series of precise movements, rotating its axes to self-correct its internal alignment. During this process, it’s crucial not to touch or disturb the gimbal.
For example, with DJI Osmo Mobile series, you attach your mobile device, enter the camera view in the app, and select “Gimbal Auto Calibration,” ensuring the device is on a level surface. Similarly, for DJI Mavic 3 Enterprise drones, you power on the drone and controller, open the DJI Pilot 2 app, navigate to camera settings, and select “Gimbal Calibration” while the drone is on a level surface.
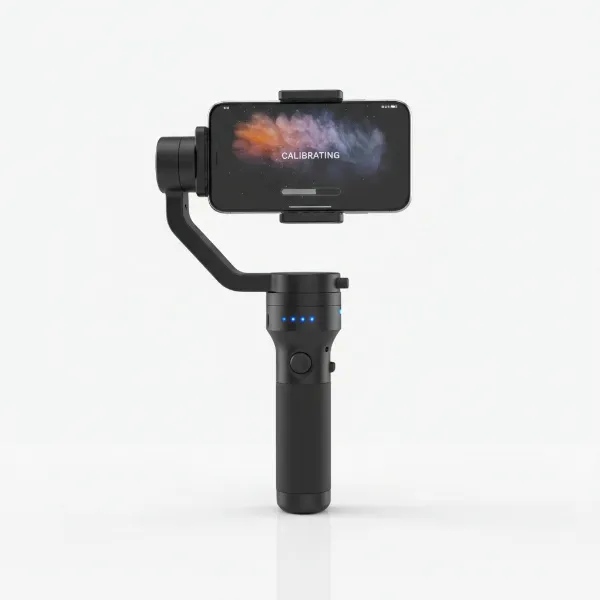 A gimbal automatically calibrating on a flat surface with a smartphone mounted, showing a stable, hands-free operation
Manual Calibration (Fine-Tuning)
While automatic calibration handles most issues, some gimbals, like the DJI OM4, offer manual adjustments for fine-tuning specific axes. This allows users to manually correct a slight horizontal tilt that might persist even after an auto-calibration. These adjustments are typically found within the gimbal’s settings menu, allowing you to incrementally adjust the rotation until the camera is perfectly level. Manual calibration is less about system-wide realignment and more about precise, user-directed correction for subtle imperfections.
Step-by-Step Guide to Gimbal Calibration (General)
While specific steps may vary slightly between brands and models, the general process for performing a successful gimbal calibration follows these principles:
- Power On and Connect: Ensure your gimbal and camera (or smartphone) are properly mounted, powered on, and connected (either physically or via Bluetooth/Wi-Fi to its companion app).
- Ensure Proper Balancing: Double-check that your camera setup is perfectly balanced on all axes. This is non-negotiable for an effective calibration.
- Access Settings: Open the gimbal’s dedicated mobile app (e.g., DJI Mimo, DJI Pilot 2) or navigate to the “Gimbal Settings” or “System Settings” menu directly on the gimbal’s display if available.
- Initiate Calibration: Look for an option labeled “Gimbal Calibration,” “Auto Calibration,” or similar.
- Place on a Level Surface: This is critical. Place your gimbal on a completely flat, stable, and vibration-free surface. For drone gimbals, ensure the entire drone is level.
- Start Calibration and Do Not Touch: Tap “START” or “OK” to begin. The gimbal will typically move through a series of rotations and adjustments. It is paramount that you do not touch, bump, or move the gimbal during this process. Any disturbance can invalidate the calibration.
- Confirmation: Once complete, the app or gimbal display will usually show a “Calibration Complete” or “OK” message.
- Test Footage: Always perform a quick test by recording some footage and observing the results. Check for level horizons, smooth movements, and the absence of any shakes or drifts.
“Proper gimbal calibration is not just a fix for problems; it’s a commitment to consistent, high-quality video production. Treat it as a routine check, not just a last resort.” – Alex Chen, Professional Cinematographer
Troubleshooting Common Calibration Issues
Even with the correct steps, you might encounter issues. Here’s how to troubleshoot them:
- Gimbal Not Calibrating or Failing Mid-Process:
- Check Surface Levelness: Ensure the gimbal is on an absolutely flat and stable surface. Even slight inclines can cause issues.
- No Physical Obstructions: Verify that nothing is blocking the gimbal’s movement, like cables, phone cases, or parts of your camera setup.
- Firmware Up-to-Date: Ensure both your gimbal and its companion app are running the latest firmware. Outdated firmware can cause unexpected behavior.
- Rebalance: A severely unbalanced setup can prevent successful calibration. Rebalance meticulously.
- Persistent Skew or Drift After Calibration:
- Manual Adjustment: If your gimbal supports it, try a minor manual horizontal adjustment as demonstrated with the DJI OM4.
- Repeat Calibration: Sometimes, repeating the auto-calibration process a second or third time can resolve minor lingering issues.
- IMU Calibration: Some gimbals offer a separate IMU (Inertial Measurement Unit) calibration. If your gimbal has this option, try performing it.
- Contact Support: If problems persist, it might indicate a hardware issue, and contacting the manufacturer’s support is advisable.
Best Practices for Gimbal Maintenance
Beyond calibration, these practices will help maintain your gimbal’s peak performance:
- Regular Balancing: Make it a habit to balance your setup every time you mount a new camera or lens.
- Keep Firmware Updated: Always update your gimbal’s firmware to access the latest features and performance enhancements.
- Handle with Care: Avoid sudden impacts or rough handling that could damage internal components.
- Store Properly: When not in use, store your gimbal in its protective case in a dry, stable environment.
- Cleanliness: Keep the motors and joints free from dust and debris.
Conclusion
Gimbal calibration is a fundamental aspect of operating your stabilization equipment, transforming potentially shaky footage into smooth, professional-grade content. By understanding when to calibrate—whether due to visible issues, firmware updates, or environmental changes—and following the correct how-to steps, you unlock your gimbal’s full potential. Remember that proper balancing precedes calibration, and both are vital for ensuring your gear performs flawlessly. Incorporate these practices into your routine, and you’ll consistently capture the fluid, cinematic shots you envision. What’s your go-to method for ensuring your gimbal is always perfectly aligned?
Frequently Asked Questions
How often should I calibrate my gimbal?
It’s generally recommended to calibrate your gimbal whenever you notice unlevel or shaky footage, after a significant firmware update, or if it experiences a hard knock. For optimal performance, some users choose to calibrate monthly or before critical shoots.
Can I calibrate my gimbal without a phone?
Many professional gimbals with onboard screens and controls allow for direct calibration without a smartphone. However, consumer-level gimbals, especially those designed for mobile phones, often require their companion app for the calibration process.
What is the difference between balancing and calibrating?
Balancing physically adjusts the camera’s center of gravity on the gimbal to reduce motor strain, while calibration electronically aligns the gimbal’s internal sensors (IMU) to ensure accurate stabilization and a level horizon. Both are crucial for optimal performance.
My gimbal is still tilted after calibration, what should I do?
If your gimbal remains tilted after auto-calibration, first re-verify that it was on a perfectly level surface during the process. If the issue persists, check if your gimbal supports manual horizontal adjustments. Otherwise, ensure firmware is updated and consider contacting manufacturer support if the tilt is significant.
Is gimbal calibration the same as IMU calibration?
IMU (Inertial Measurement Unit) calibration is often a component of the broader gimbal calibration process, specifically focusing on the sensors that detect motion and orientation. While related, some advanced gimbals might offer separate IMU calibration as an additional fine-tuning step.