Embarking on a cinematic journey with long lenses can transform your storytelling, offering breathtaking close-ups and expansive, compressed perspectives. However, achieving that coveted buttery-smooth footage with a telephoto or heavy zoom lens on a gimbal is often considered a daunting challenge. The inherent physics of these formidable optics can quickly turn a fluid shot into a shaky mess if not properly managed. This guide will demystify the process, providing you with the essential knowledge and practical steps to expertly balance your long lens on any gimbal setup, ensuring your motors work smarter, not harder, and your shots remain flawlessly stable.
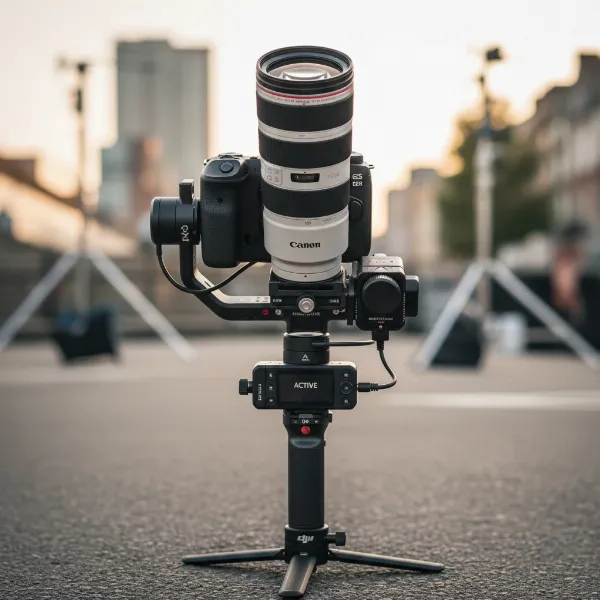 Professional camera with a long telephoto lens mounted on a three-axis gimbal, ready for shooting.
Understanding the Unique Challenges of Long Lenses on Gimbals
Long lenses, while powerful, introduce specific challenges to gimbal stabilization that differ significantly from standard or wide-angle lenses. Ignoring these can lead to compromised footage and even equipment damage.
Weight Distribution and Center of Gravity Shift
|
Our Picks for the Best Washing Machine in 2026
As an Amazon Associate I earn from qualifying purchases.
|
||
| Num | Product | Action |
|---|---|---|
| 1 | COSTWAY Portable Washing Machine, Twin Tub 26 Lbs Capacity, 18 Lbs Washer and 8 Lbs Spinner, Compact Washer with Control Knobs, Timer Function, Drain Pump, Laundry washer for Apartment RV, Blue |

|
| 2 | COSTWAY Portable Washing Machine, Twin Tub 26lbs Capacity Laundry Washer, 18lbs Washer and 8lbs Spinner Combo with Timer Knobs, Built-in Drain Pump, Compact Washer for Home Dorm Apartment, Blue+White |
|
| 3 | Portable Washing Machine - Compact 2.0 Cu.ft Portable Washer, Full-Automatic Top Loader for Space Saving, Ideal for Apartments, Homes, and Dorms, 10 Wash Cycles, Low Noise, IPX4 with Drain Pump |
|
| 4 | Giantex Portable Washing Machine, 20lbs Capacity, Twin Tub 2lbs Washer & 8lbs Spinner Combo, Compact for Apartment RV Dorms, Blue & White, GT24267-PE |
|
| 5 | Giantex Portable Washing Machine, 17.6lbs Compact Washer Spinner Combo with Pump Drain, Twin Tub 11lbs Wash & 6.6lbs Spin, Lavadoras Portatiles for Apartment RV Dorm College (White & Blue) |
|
| 6 | COSTWAY Portable Washing Machine, Twin Tub 26lbs Capacity Laundry, 18lbs Washer and 8lbs Spinner Combo with Timer Knobs, Built-in Drain Pump, Compact Washer for Home Dorm Apartment (Grey+White) |
|
| 7 | Avanti Portable Compact Washing Machine for Clothes/Laundry, 0.84 Cu. Ft. Capacity, Standard Sink/Faucet Attachment for Apartment, Dorm, RV, White |
|
| 8 | Giantex Portable Washing Machine, 21lbs Capacity, 14.4lbs Washer and 6.6Llbs Spinner, Compact for Apartment RV, White & Gray, GT-GE-10390US-GR-FP |
|
| 9 | Portable Washing Machine,16L Upgraded Large Capacity Portable Washer With 3 Modes Deep Cleaning.Suitable For Travel, Camping,Apartments, Dormitories, Hotels (Green) |
|
| 10 | Waterjoy Portable Washing Machines, 7.7 lbs Load Capacity Portable Washer and Dryer Combo with Built-in Barrel Light & LED Display for Household and Apartment (Blue) |
|
The primary hurdle with long lenses is their weight and extended physical length. This combination drastically shifts the center of gravity forward, away from the camera body. When mounted on a gimbal, this front-heavy imbalance forces the gimbal’s motors to constantly fight against gravity, leading to an overcompensation that can manifest as jerky movements or unexpected tilting.
Increased Motor Strain and Performance Issues
An unbalanced setup means your gimbal’s motors are under continuous stress. This excessive strain quickly drains battery life, can cause motors to overheat, and reduces the overall lifespan of your stabilizer. Moreover, motors working harder than intended are more prone to producing micro-jitters or vibrations that degrade image quality, especially noticeable at longer focal lengths.
Vibrations, Jitter, and Unstable Footage
Even the slightest imbalance is amplified by the extended leverage of a long lens. What might be an imperceptible drift with a small prime lens can become a prominent wobble with a telephoto. This leads to blurry images and footage that lacks the professional polish gimbals are designed to provide.
Potential Equipment Damage
Constant, uncorrected strain on the gimbal motors isn’t the only concern. The sustained stress from an unbalanced lens can also damage the gimbal’s internal components, the lens mount on your camera, and even the lens collar itself. Proper balancing is a protective measure for your valuable gear.
Essential Gear for Balancing Long Lenses
To effectively balance a long lens, you’ll need more than just your camera and gimbal. Specific accessories play a crucial role in achieving stability.
Choosing the Right Gimbal
Not all gimbals are created equal when it comes to handling heavy, long lenses. It’s paramount to select a gimbal with a sufficient payload capacity that comfortably exceeds the combined weight of your camera body, lens, and all attached accessories. A powerful gimbal designed for heavier setups will offer more robust motors and a larger range of adjustment, making balancing easier and performance more reliable.
Lens Plates and Tripod Collars
For long telephoto lenses, a sturdy, elongated lens plate is indispensable. Many long lenses come with a tripod collar (also known as a lens foot) which is the ideal mounting point. Attaching the quick-release plate to this collar, rather than the camera body, allows you to shift the entire setup forward or backward more effectively, finding the true center of gravity of the lens itself.
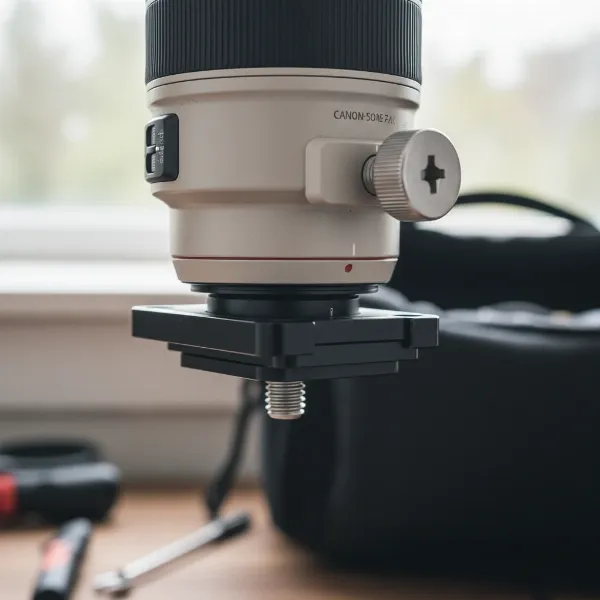 A quick-release plate securely attached to the tripod collar (lens foot) of a long camera lens.
The Role of Counterweights
Counterweights are often the unsung heroes of balancing long lenses. When your setup is significantly front-heavy and you’ve exhausted the available backward adjustment on your gimbal, counterweights provide the necessary ballast at the rear of the camera plate or gimbal arm. These small, stackable weights help redistribute the load, bringing the center of gravity back to the gimbal’s pivot points and significantly reducing motor strain.
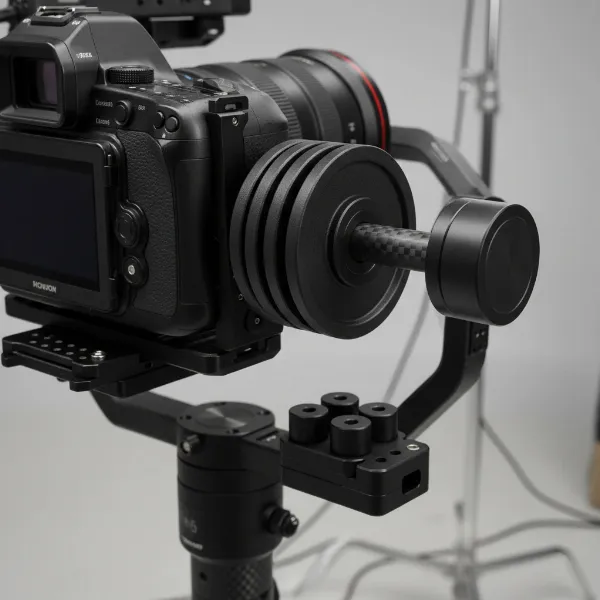 Stackable counterweights mounted on the rear of a gimbal's camera plate to balance a long lens.
Lens Support Systems and Extension Arms
For exceptionally long or heavy telephoto lenses, a dedicated lens support bracket can further enhance stability by cradling the lens barrel, preventing flex and absorbing micro-vibrations. Some gimbals also offer extension arms or modular systems that allow you to lengthen the gimbal’s frame, providing more room for adjustment with very long setups that might otherwise hit the gimbal’s frame.
Pre-Balancing Checklist: Setting Up Your Rig
Before you even begin adjusting the gimbal axes, a thorough preparation of your camera and lens setup is crucial. Skipping these steps will inevitably lead to rebalancing later.
Attach All Accessories
Ensure every accessory you plan to use during your shoot is attached before balancing. This includes lens hoods, filters (like ND filters), microphones, external monitors, wireless transmitters, follow focus motors, and even camera straps. Each item adds weight and alters the center of gravity.
Battery and Storage Cards Inserted
Always balance your camera with a fully charged battery and memory card inserted. The slight weight difference of a battery can be enough to throw off a precise balance.
Zoom Lens Consideration: Balancing at Mid-Focal Length
If you are using a zoom lens, especially one where the barrel extends or retracts (changing the center of gravity), it’s recommended to balance the lens at its middle focal length. While zooming will still slightly affect the balance, balancing at the midpoint often provides the most forgiving range for minor focal length adjustments during a shoot. For critical shots or significant focal length changes, be prepared for slight re-adjustments.
Firmware Updates
Periodically check for and install the latest firmware updates for your gimbal. Manufacturers often release updates that improve motor algorithms, balancing capabilities, and overall performance, which can be particularly beneficial for challenging setups with long lenses.
Step-by-Step Gimbal Balancing for Long Lenses
Balancing a gimbal involves systematically adjusting each of its three axes: tilt, roll, and pan. Always start with the tilt axis and work your way through.
Step 1: Mount the Camera and Lens
First, securely attach your camera and lens setup to the gimbal’s quick-release plate. Ensure the plate is firmly tightened to your lens collar (if available) or camera body. Mount the plate onto the gimbal’s base and lock it in place. Make sure all gimbal axis locks are initially engaged.
Step 2: Balance the Tilt (Forward/Backward) Axis
The tilt axis controls the camera’s up and down movement.
- Unlock the Tilt Axis: Release the lock for the tilt axis only.
- Horizontal Balance: Point your camera straight forward. Loosen the fore-aft adjustment screw on the quick-release plate. If the lens is front-heavy (which long lenses almost always are), it will dip forward. Slide the camera/lens backward on the plate until it remains perfectly level when you let go. If it’s too far back, it will tilt upward. Find the sweet spot where it holds its position. Tighten the adjustment screw.
- Vertical Balance (Optional/Advanced): Point your camera straight up towards the ceiling. If it falls backward or forward, loosen the vertical arm adjustment (on the gimbal itself, not the quick-release plate) and slide the camera assembly up or down until it stays pointing upward without assistance. Some gimbals may not have this second tilt adjustment.
Step 3: Balance the Roll (Side-to-Side) Axis
The roll axis controls the camera’s rotation around its optical axis.
- Lock the Tilt Axis: Once the tilt axis is balanced, lock it to prevent accidental movement.
- Unlock the Roll Axis: Release the lock for the roll axis.
- Lateral Balance: If the camera tilts to one side, loosen the lateral adjustment knob (usually on the cross arm) and slide the arm left or right until the camera remains perfectly level, without leaning. Tighten the adjustment knob.
Step 4: Balance the Pan (Yaw) Axis
The pan axis controls the gimbal’s horizontal rotation.
- Lock the Roll Axis: Lock the roll axis once it’s balanced.
- Unlock the Pan Axis: Release the lock for the pan axis.
- Rotational Balance: Hold the gimbal in your hand and tilt it forward about 45 degrees. If the gimbal rotates on its own, it’s unbalanced. Loosen the pan axis adjustment knob (usually at the base of the gimbal) and slide the entire vertical arm assembly forward or backward until the gimbal stays in position when tilted. Tighten the adjustment.
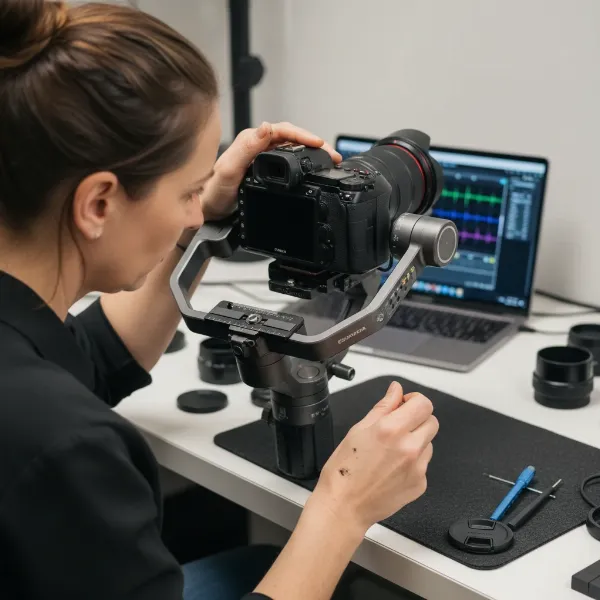 A person carefully adjusting a gimbal's axes (tilt, roll, pan) to achieve perfect balance with a long lens.
“Proper balancing isn’t just about smooth footage; it’s about preserving your equipment and maximizing battery life. A perfectly balanced rig feels almost weightless to the motors.” – Johnathan Lee, Professional Cinematographer
Fine-Tuning Your Gimbal for Peak Performance
Once the mechanical balance is achieved, electronic fine-tuning through your gimbal’s software or app is the next critical step.
Using Gimbal Auto-Tune Features
Most modern gimbals include an “Auto-Tune” or “Auto Calibration” function. This feature allows the gimbal’s motors to analyze the weight and balance of your setup and automatically adjust motor power and responsiveness. Always run this function after achieving a mechanical balance for optimal performance.
Adjusting Motor Strength and Responsiveness
If you find your gimbal motors still straining or acting overly aggressive, you can manually adjust motor strength settings within the gimbal’s app. For heavy setups, increasing motor strength slightly can provide more stability, while overly high settings might lead to vibrations. Conversely, if the gimbal is too twitchy with a lighter setup, you might reduce motor power. Experiment to find the optimal balance.
Understanding Deadband Settings
The deadband refers to the small range of movement within which the gimbal motors do not react. Adjusting this can prevent unnecessary motor engagement from tiny, unintentional hand movements. A slightly higher deadband can reduce motor jitters, especially with long lenses, but too high and the gimbal might feel unresponsive.
Testing Your Setup
After balancing and fine-tuning, conduct thorough tests. Move the gimbal through various pans, tilts, and rolls. Walk with it, simulate different shooting scenarios, and observe for any jitters, drifts, or motor sounds. Make small adjustments as needed, remembering that perfection is often in the minute details.
 A cinematographer testing a gimbal with a long lens in an outdoor shooting environment, observing footage.
Troubleshooting Common Balancing Issues
Even with the best techniques, challenges can arise. Here’s how to address them.
Gimbal Drifting or Jittering
If your gimbal drifts or exhibits subtle jitters even after balancing, re-check each axis meticulously. Ensure all screws are tightened. If the issue persists, the motor strength or deadband settings might need adjustment via the app. Sometimes, simply running the auto-tune function again can resolve minor drifts.
Motors Overheating or Straining
This is a clear indicator of an unbalanced setup or insufficient motor power. First, re-evaluate your mechanical balance, paying close attention to whether counterweights are needed to offset a front-heavy lens. If the balance is good, increase the motor strength settings slightly in your gimbal’s app. Remember to remove any non-essential accessories to reduce overall weight.
Difficulty Achieving Perfect Balance
For extremely long or heavy lenses, conventional adjustments might not be enough. This is where dedicated accessories like longer quick-release plates, counterweight systems, or gimbal extension arms become indispensable. These provide the necessary leverage and weight distribution to achieve a stable center of gravity. Ensure no cables are snagging or pulling on the camera, as this can easily disrupt balance.
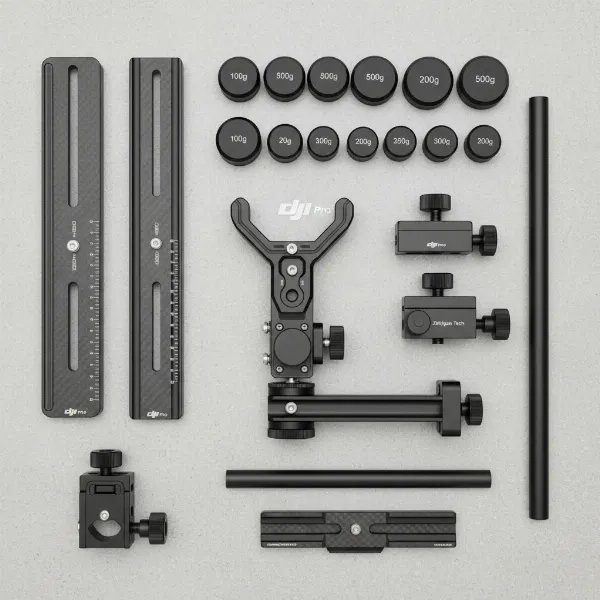 An array of specialized gimbal accessories designed for balancing heavy long lenses, including plates, weights, and supports.
Impact of Zooming and Focusing
As noted, zoom lenses can be tricky because their center of gravity shifts with focal length changes. If you plan to zoom frequently during a shot, consider using prime lenses instead on the gimbal, or be prepared for minor balance shifts. For critical work, re-balancing after a significant focal length change might be necessary. Some advanced gimbals with robust motors can compensate for slight changes, but it’s not foolproof.
Pro Tips for Optimal Gimbal Use with Long Lenses
Beyond balancing, a few best practices can dramatically improve your long lens gimbal shots.
Mind Your Cables and Attachments
Ensure all cables (HDMI, power, control) are neatly routed and secured, ideally with slack to prevent them from pulling on the camera or lens as the gimbal moves. A loose cable can subtly throw off your balance and introduce unwanted vibrations. Similarly, remove unnecessary accessories like camera straps, which can sway and interfere with stabilization.
Practice the “Ninja Walk”
Even with a perfectly balanced gimbal, your body movements can introduce vertical bounce or sway. The “ninja walk” or “gimbal walk” technique, which involves bending your knees, rolling from heel to toe, and keeping your core stable, helps absorb these movements, resulting in smoother, more cinematic footage. Practice is key to mastering this fluid motion.
 A person demonstrating the "ninja walk" technique while operating a gimbal with a camera and long lens.
Regular Maintenance and Inspection
Regularly check all screws, clamps, and connections for tightness. Dust and grime can interfere with smooth adjustments, so keep your gimbal clean. Inspect your lens plate and tripod collar for wear that might affect a secure mount.
Conclusion
Balancing long lenses on a gimbal setup is undoubtedly more intricate than with standard lenses, but it’s a skill that can be mastered with patience and the right approach. By understanding the unique challenges, utilizing essential accessories like counterweights and appropriate lens plates, and meticulously following the step-by-step balancing process for each axis, you can achieve professional-grade, stable footage. Fine-tuning your gimbal’s motor settings and adopting professional shooting practices will further enhance your results. Remember, a perfectly balanced gimbal minimizes motor strain, extends battery life, and most importantly, ensures your powerful long lenses capture the stunning, smooth imagery they were designed for. What creative projects will you unlock with your newly mastered gimbal skills?
Frequently Asked Questions
Can I use any gimbal with a long lens?
No, not all gimbals are suitable for long lenses. The most crucial factor is the gimbal’s payload capacity. Ensure your gimbal can comfortably support the combined weight of your camera body, long lens, and all accessories. Overloading a gimbal will lead to poor performance, motor strain, and potential damage.
How often should I re-balance my gimbal?
You should re-balance your gimbal every time you change any significant part of your setup, including the camera, lens, filters, battery (if it’s a different weight), or add/remove accessories. Even slight changes can shift the center of gravity and compromise stability. For zoom lenses, consider re-balancing if you plan to shoot primarily at an extreme focal length.
What are counterweights and why are they important?
Counterweights are small, often stackable weights attached to the rear of your gimbal’s camera plate or arm. They are critical for balancing long, front-heavy lenses by redistributing the overall weight of your camera setup. This shifts the center of gravity back to the gimbal’s pivot points, reducing strain on the motors and enabling smoother, more stable operation.
Does a lens support really make a difference for long lenses on a gimbal?
Yes, for very long or heavy telephoto lenses, a lens support bracket can make a significant difference. It provides an additional point of contact and support for the lens barrel, preventing flex, minimizing micro-vibrations, and reducing strain on the camera’s lens mount. This contributes to overall stability and sharper images.
What if my gimbal still isn’t stable after balancing?
If your gimbal remains unstable, check for common issues: ensure all mechanical axis locks are fully disengaged (after balancing), all screws are tight, and no cables are snagging. Re-run the auto-tune function in your gimbal’s app. If problems persist, consider adjusting motor strength and deadband settings manually. In some cases, the setup might simply exceed the gimbal’s capabilities, requiring a gimbal with a higher payload capacity or more robust accessories.