Achieving buttery-smooth footage with your camera gimbal seems like a daunting task, often perceived as a time-consuming ritual that eats into precious shooting minutes. Many videographers, from seasoned pros to enthusiastic beginners, grapple with the challenge of perfectly balancing their 3-axis gimbal. An unbalanced gimbal can lead to shaky shots, excessive motor strain, and reduced battery life, undermining the very purpose of this essential stabilization tool. But what if we told you that mastering the art of gimbal balancing doesn’t require an hour of fiddling, but can be done accurately and efficiently in just 5 minutes? This comprehensive guide will break down the precise, step-by-step process, ensuring your camera setup is ready for action in record time, transforming your video workflow and elevating your content quality.
What You’ll Need for Perfect Balance
Before diving into the balancing act, gather everything you’ll be using with your camera on the gimbal. Accuracy is paramount, and any change in weight after balancing will require a re-calibration.
- Your Camera: Ensure all essential accessories are attached.
- Lens: Mount the lens you plan to shoot with. If using a zoom lens, extend it to the midpoint of its zoom range for the most versatile balance.
- Batteries & Memory Cards: Insert these into your camera.
- Lens Cap OFF: Never balance with the lens cap on.
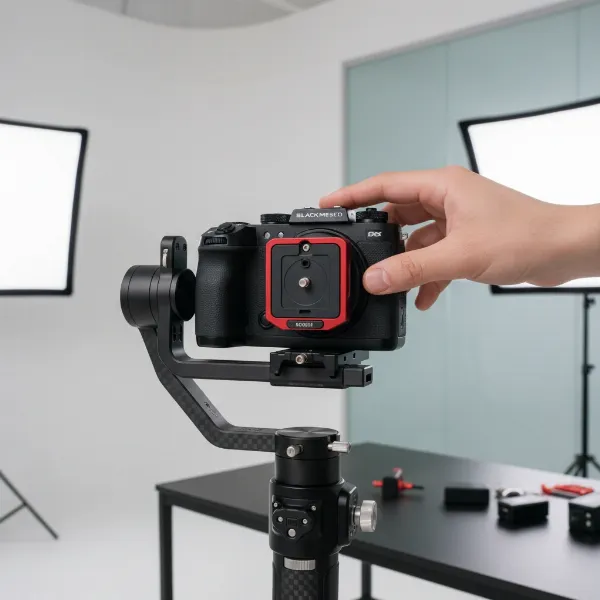
- Quick Release Plate: Attach it securely to your camera body.
- Gimbal: Make sure all axis locks are disengaged before starting the balancing process.
Understanding the 3 Axes of Your Gimbal
A 3-axis gimbal stabilizes your camera across three distinct rotational axes:
- Tilt (Pitch) Axis: This controls the camera’s up and down movement. Balancing this axis ensures your camera doesn’t nod forward or backward independently.
- Roll Axis: This handles the camera’s side-to-side tilt, keeping your horizon level. An unbalanced roll axis will cause the camera to lean to one side.
- Pan (Yaw) Axis: This governs the camera’s horizontal rotation. Balancing this prevents the camera from drifting left or right when the gimbal is still.
The goal is to find the perfect center of gravity for your camera setup on each axis, allowing it to remain stationary in any position you leave it when the gimbal motors are off.
Step-by-Step Gimbal Balancing Guide
Let’s break down the balancing process into manageable steps, designed for speed and precision. Remember to make small, iterative adjustments and tighten each lock securely after balancing an axis.
1. Balancing the Tilt Axis (Front-to-Back)
This is often the first and most critical step.
- Mount Your Camera: Slide your camera (with the quick release plate attached) onto the gimbal’s mounting plate. Lock the tilt axis, but leave the other axes unlocked.
- Check for Front/Back Lean: Gently tilt the camera forward. If it falls forward, it’s front-heavy. If it falls backward, it’s back-heavy.
- Adjust the Mounting Plate: Loosen the quick-release plate clamp and slide the camera forward or backward until it remains level when tilted at any angle (e.g., pointing slightly up, straight ahead, or slightly down).
- Lock It Down: Once balanced, tighten the quick-release plate clamp securely.
 Camera on gimbal, adjusting tilt axis for front-back balance
2. Balancing the Tilt Axis (Vertical)
This step fine-tunes the vertical center of gravity, preventing unexpected tilting.
- Point Camera Upwards: Unlock the vertical arm of the tilt axis (the arm that moves up and down). Point your camera straight up towards the sky.
- Check Vertical Stability: Release the camera. If it stays pointing straight up, it’s balanced. If it falls forward or backward, adjust the vertical arm.
- Adjust the Vertical Arm: Move the vertical arm up or down until the camera remains pointing straight up (or straight down) without drifting.
- Lock It Down: Tighten the vertical arm lock.
3. Balancing the Roll Axis (Side-to-Side)
Now, we ensure your horizon stays perfectly level.
- Position the Camera: Orient your camera so it’s pointing straight ahead. Unlock the roll axis, leaving the other axes locked (or manually held stable).
- Check for Side Lean: Gently tilt the gimbal to the side, then release the camera. If the camera rolls to the left or right, it’s unbalanced.
- Adjust the Horizontal Arm: Loosen the roll axis’s horizontal arm lock and slide the camera assembly left or right until it maintains its position without rolling when you tilt the gimbal.
- Lock It Down: Securely tighten the horizontal arm lock for the roll axis.
4. Balancing the Pan Axis
The final axis ensures smooth horizontal movements.
- Hold the Gimbal Horizontally: Unlock the pan axis. Hold your gimbal level, as if you’re about to shoot.
- Tilt the Gimbal: Tilt the entire gimbal forward or backward by about 45 degrees.
- Check for Drift: If the camera head rotates or drifts on its own, the pan axis is unbalanced.
- Adjust the Pan Arm: Loosen the pan axis’s adjustment knob (usually on the handle or a vertical arm) and slide the arm forward or backward until the gimbal remains stable and doesn’t rotate when tilted.
- Lock It Down: Tighten the pan axis lock.
 Fully balanced camera gimbal, stable and ready for filmmaking
Fine-Tuning and Auto-Calibration
Even after meticulous manual balancing, modern gimbals offer an auto-calibration or motor tuning feature.
- Perform Auto-Tune: With all axes manually balanced and locked, power on your gimbal. Access its menu (either on the gimbal screen or via a smartphone app) and initiate the “Auto Tune,” “Motor Calibration,” or “Auto Balance” function. The gimbal will typically perform a series of self-adjustments, ensuring optimal motor strength for your camera’s weight. This step is crucial for minimizing motor vibrations and maximizing battery efficiency.
Common Gimbal Balancing Mistakes to Avoid
- Skipping Pre-Setup: Always have your complete camera rig (lens, battery, card, quick release plate) ready before you start balancing. Adding or removing components will throw off your balance.
- Not Tightening Locks: A loose lock is an unbalanced gimbal waiting to happen. Double-check every adjustment knob.
- Balancing with Lens Cap On: This minor oversight can make a significant difference. Always remove it.
- Powering an Unbalanced Gimbal: This stresses the motors unnecessarily, leading to vibrations, overheating, and potential damage.
- Rushing Adjustments: While we aim for 5 minutes, quick doesn’t mean careless. Make small, precise movements until the camera holds its position.
Tips for Maintaining Optimal Gimbal Performance
- Re-balance with Gear Changes: Every time you swap a lens, add a microphone, or even change a heavy filter, re-balance your gimbal.
- Check Firmware: Keep your gimbal’s firmware updated to benefit from improved stabilization algorithms and bug fixes.
- Store Properly: When not in use, lock the gimbal axes and store it in its protective case to prevent accidental damage.
- Clean Regularly: Dust and debris can affect the smoothness of the gimbal’s joints. Use a soft cloth to keep it clean.
“A perfectly balanced gimbal is like a well-tuned instrument; it responds effortlessly to your touch, allowing your creative vision to flow uninterrupted into smooth, cinematic motion.”
Conclusion
Mastering the perfect balance of your 3-axis gimbal is a fundamental skill for any videographer aiming for professional-grade footage. By following these precise, step-by-step instructions, you can streamline your setup process, ensuring your camera is perfectly stabilized and ready to capture stunning, fluid shots in as little as 5 minutes. This efficiency not only saves valuable time on set but also extends the life of your equipment and enhances the overall quality of your productions. So, unlock those axes, make those micro-adjustments, and prepare to elevate your filmmaking. What’s the most challenging balancing act you’ve tackled with your gimbal?
Frequently Asked Questions
How do I know if my gimbal is perfectly balanced?
Your gimbal is perfectly balanced when your camera remains stationary in any position you leave it—whether pointing up, down, or sideways—even when the gimbal is powered off and all axes are unlocked. If it drifts or falls, further adjustments are needed.
Can an unbalanced gimbal damage my camera or gimbal?
Yes, an unbalanced gimbal forces the motors to work harder, leading to excessive heat, vibrations, and premature wear. In extreme cases, it can cause motors to fail or even damage your camera due’s to violent movements.
Should I balance my zoom lens at its widest or longest focal length?
For optimal versatility, it’s best to balance your zoom lens at the midpoint of its focal range. This provides a compromise that works reasonably well across the entire zoom range, reducing the need for constant re-balancing during a shoot.
What if my gimbal can’t achieve perfect balance due to heavy accessories?
If you’re using heavy accessories, consider external counterweights. These small weights can be attached to the gimbal arms to offset imbalances, especially when your camera setup pushes the limits of the gimbal’s payload capacity.
Is auto-calibration enough for gimbal balancing?
No, auto-calibration should always be performed after manual balancing. Manual balancing gets the camera as close to the center of gravity as possible, allowing the motors to work minimally. Auto-calibration fine-tunes motor power for that manually balanced setup.